Elon University Home

Category Archives: Moodle

Nothing to hand in? Use Moodle’s Offline activity

An image of a person throwing paperThere are many ways to evaluate students – and not all of them involve submiting an assignment. Activities like in-class group presentations don’t require students to submit anything. For those type of assignments, Moodle’s Offline activity allows you to add items to your gradebook without requiring the students to hand in anything.

A tool for communicating the details

The Offline activity allows you to post activity requirements, expectations, and a due date while also leaving an entry in the gradebook for the grade. Other ideas for this tool are:

  • in-class presentations
  • an interview in the local community
  • posting homework to be completed and physically turn in at the next class session
  • gathering outside resources (i.e. pictures or video)
  • non-graded work completed outside of class (i.e. attending a cultural event)
  • class participation
  • contributions to a project/document living outside of Moodle (i.e. blog, wiki, group presentation)

Grading Offline activities

Grading works normally, and students will get notification of their grades once you enter them manually.

Adding an Offline activity

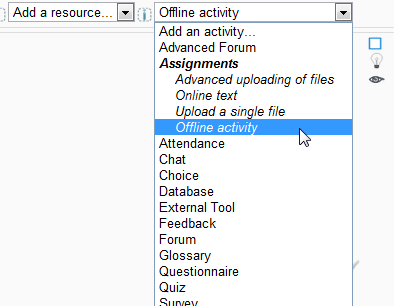
The offline activity is an option you can select in the assignment area.

Offline Activity

Read more about Moodle’s assignments types.

Image by Flickr user kharied / Creative Commons licensed BY-NC-NC 2.0

Also posted in assignment, Moodle Musings, Offline, Teaching and Learning | Comments Off on Nothing to hand in? Use Moodle’s Offline activity

Juggle fewer files with Moodle’s online text

With the new online text feature in the assignment module,  you can juggle fewer files and save time.

This assignment feature allows students to complete composition work without having additional software installed on their computer, and it allows you to grade without ever leaving the LMS.

To see all the features of the assignment module visit:  http://docs.moodle.org/22/en/Assignment_module

Online text can simplify your life

Online text can simplify assignment gathering because  student writings are stored in Moodle like a webpage and instructors can read and provide feedback directly in Moodle. Continue reading »

Also posted in assignments, Moodle Musings, Teaching and Learning | Comments Off on Juggle fewer files with Moodle’s online text

Saving courses currently in Blackboard before moving to Moodle

Preparing for the move to Moodle

Converting from Blackboard to Moodle is like moving to a new house.  If your current Blackboard courses are filled with items no longer used, moving them to Moodle will only make matters worse.  So before migrating to Moodle, it’s a good time to delete old or unused items, and organize your files.

How do I get to my courses currently in Blackboard?

Through early fall 2012, you may access your Blackboard files at blackboard.elon.edu. No new courses or data are being added to Blackboard as of June 1, 2012. Elon’s Blackboard server will be taken fully offline in early Fall 2012. After the Blackboard server is taken offline, faculty may open their archived or exported Blackboard course files by using a free Blackboard application called Coursesites.

We recommended that you save your Blackboard courses for archival purposes and potential future use. The method you use to save or download depends on your intended use for the saved files.

Can tests and quizzes be exported from Blackboard and loaded into Moodle?

Yes and no. Quizzes and tests can be exported from Blackboard then imported into Moodle, but it’s not an exact science, and it has to be done by a system administrator. Due to the volume of courses being updated, we ask that you request conversion of tests or quizzes with 50 or more questions. If you have quizzes or tests with 50 or less items, you are encouraged to re-enter these into Moodle. You can copy and paste text into Moodle from Word or a text editor.

Some question types are not transferable from Blackboard to Moodle. Namely, “Fill in the Blank” questions, “Jumbled Sentence” questions, and “Combination” questions will not transfer. You will need to rebuild these types of questions.

Three ways to save your courses
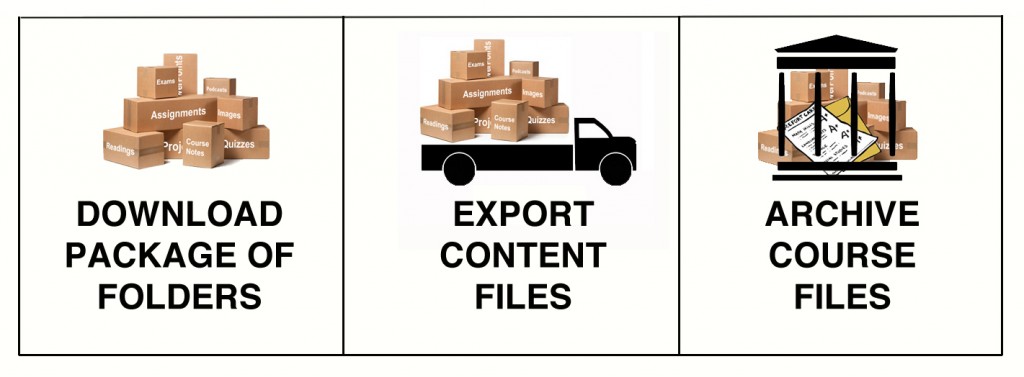
Download package. This process combines the files and folders stored in your Course Content folder. It downloads a zipped file, which can be unzipped on your computer to reveal standard documents and folders. This method gives you the most control over organizing and updating your course files to be used in Moodle.

  • Use to download to your computer to organize, cleanup, or update files, then upload     individually zipped file folders or documents into Moodle as needed.

Export. Exports content files such as selected standard tests and quizzes, or documents. Exports in zipped data file, which can be accessed only with an extractor application such as bFree or converted into files recognized by Moodle.

  • Use to store your course files for archival purposes or to convert into Moodle with quiz or     test questions.

Archive course. Saves all content and interactions associated with the course, such as tests, grades, and other student data. Exports in zipped data file, which can be accessed only with an extractor application such bFree or converted into files recognized by Moodle.

  • Use to store your course files for archival purposes in a secure location. Not recommended for converting to Moodle.

All three processes produce a zipped file that you download and use or store on your own computer or hard drive.

How to download a package of files

In order to download content files as a zipped package, you’ll need to move all the content to one location in the area called Course Files. Under Control Panel, click Packages and Utilities. Then click on Move Files to Course Files.
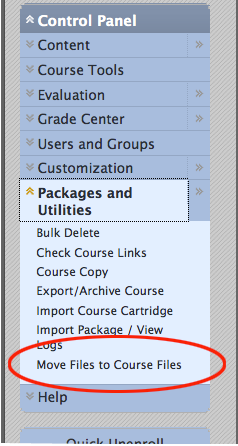
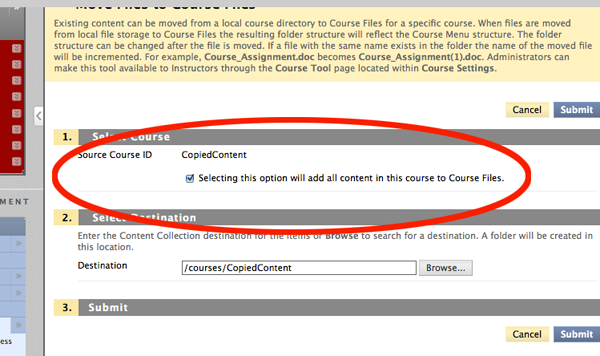
You’ll be asked to confirm your selection on this page, then click Submit.
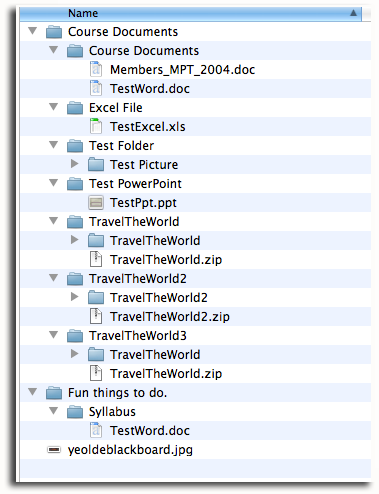
To verify that content has been consolidated, click on the Course Content selection under Content in the Control Panel.

When you’re ready to download the files, click in the box near “Download Package” in the upper left corner of the page, then click Download Package.  The zipped file is downloaded and saved to your computer. You’ll probably find it under “downloads” unless you’ve selected a different location.

Content

Click on the zipped file name on your computer. A folder is created that contains all the files from the course.  Now your course content is available for you to inspect, clean out, or rearrange before uploading the files into Moodle.
Once you’re satisfied with your file arrangement, you can use the “drag and drop” method to move files from your desktop into your new Moodle course.

How to Export or Archive course files

The Export function creates a package of the course content that can later be imported and used for another course with the same content. It is important to note that, unlike the Archive feature, the Export function does not include any user interactions with the course—it only includes the content and the tools.

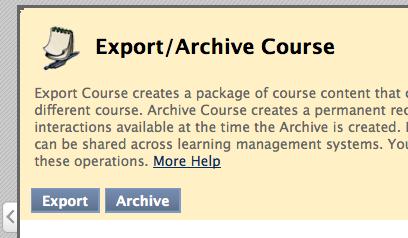
To select either Export or Archive, click on the link that says Export/Archive Course, under the Control Panel.
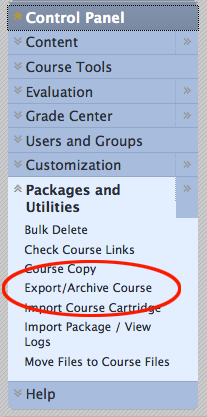
Export/Archive

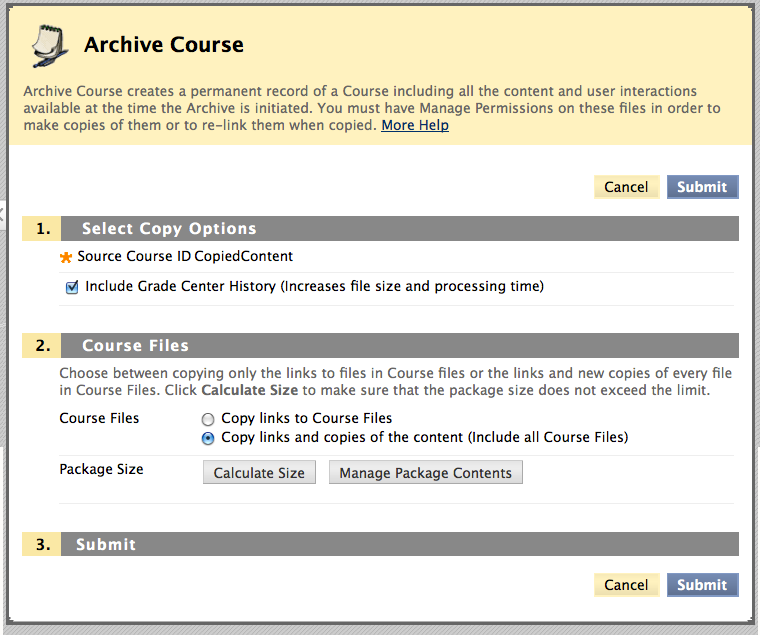
The Archive function is located on the same page as Export.  Archive contains all course content files plus and interactions in the course.
When Exporting, you can check those items that you want to be archived. (When in doubt, check the box – if that section is empty, it doesn’t take up any more room.)

When you click on either selection, a message will tell you that you’ll get an email notification once the zipped file has been created.
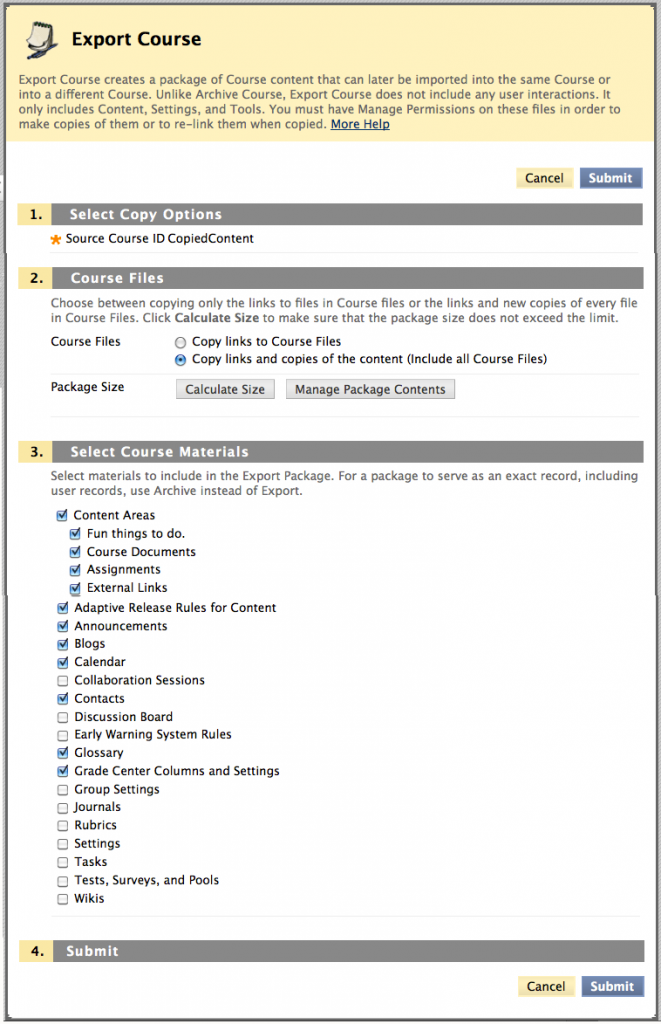
Example of export course

Example of Archive Course

Export and Archive packages are downloaded as compressed .zip files. Do not unzip an Export or Archive package or remove files from the package. Zipped Export and Archive files are in database format that contains additional folder levels and navigational coding.
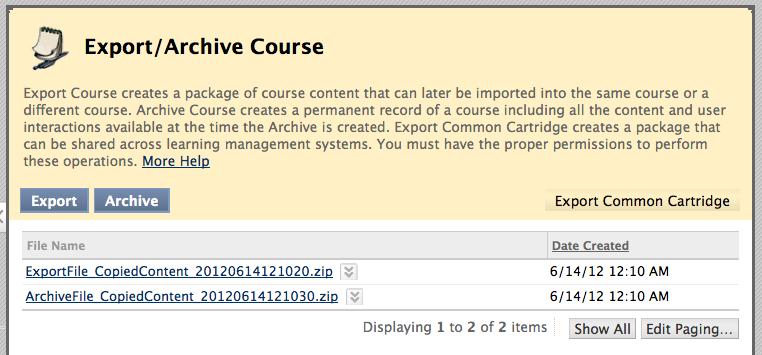
Once you have Exported or Archived your course files, copy and store them in a secure location for safekeeping and later access. Remember, you can open these files by uploading them back into Coursesites, or you can use a file extractor such as bFree.

bFree logoTo review and organize files from your Export or Archive zipped files, you can open the zip file using an extractor application called bFree.

Download this application from the site at its2.unc.edu/tl/tli/bFree/ and open the application on your computer. (It works on PC and Mac.) Then use the File -> Open to open the zipped Export file. Check those items you want to extract, then click Extract as files/folders.
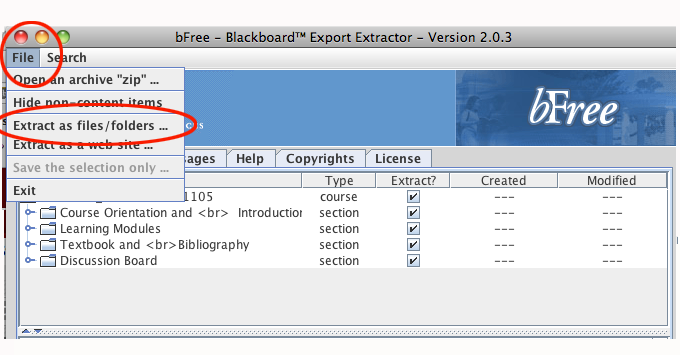
If you have elected to use the Exported or Archived zip files to move content into Moodle, send a request for conversion from Blackboard to Moodle to Teaching and Learning Technologies at tlt@elon.edu.


Photo of Ben McFadyenAbout the author

Ben McFadyen is an academic technology consultant at Elon University who actively translates between teaching, learning, and technology. He works with faculty to explore how technology can be used to enhance student learning and provide efficient, effective ways to achieve pedagogical goals.

Also posted in archive, Blackboard, Moodle Musings, Teaching and Learning | Comments Off on Saving courses currently in Blackboard before moving to Moodle

A case for rubrics: Four student benefits and teacher tips for use

Guest post by Moodlerooms – Elon’s Moodle partner.
By: Laura Lea Rand, M.Ed., Moodlerooms Instructional Designer and Trainer

As every educator knows, a rubric is a scoring tool typically used for formative assessments. Rubrics can be especially helpful when used for assessments that may be subjective in nature. They allow for standardized scoring according to specified criteria, making grading simpler for teachers and more transparent to the student receiving the grade.

When we think about how well a student completes a specific task, we don’t usually think of the performance as being “right” or “wrong,” like we would an answer to a multiple choice question. Instead, we rate the student’s performance along a continuum of indicators, such as “Excellent, Good, Basic, Poor.” Rubrics assist the teacher in marking specific points of judgment along a continuum, so that students are consistently judged upon how well they have met realistic and suitable expectations.

As teachers, we certainly benefit from the use of rubrics in that they save us time and provide consistency in grading. However, we often forget that our students also see wonderful benefits from the use of rubrics as well. In today’s post, I want to share four reasons to include rubrics as a major course grading method, and how you as a teacher can ensure that rubrics live up to “all the hype.”

#1 – Rubrics guide students in performance and teach them that learning is their responsibility.

Rubrics share with students what is expected of them before they begin a specific task, thus directing them to learn what is necessary to be successful (and most often more what than is needed). In this way, rubrics help students set learning goals and take the responsibility for their learning into their own hands. Knowing what skills make up a desired performance encourage students to strive to achieve it.

Teacher Tip: Allow your students to participate in the design of rubrics you will grade them by, and empower them to become intrinsically motivated learners. Consider using the Moodle Forum activity to ask students what they think they should have learned from a specific topic, and how you can grade their learning fairly and accurately.

#2 – Rubrics encourage students to become self-reflective.

Rubrics created for the purposes of peer- and self-assessment assist students in developing their personal ability to judge excellence, or the lack thereof, in their work and others’. By providing rubrics to students before an assignment is due, they can review their work to see how it measures up against the rubric, and make adjustments if needed.

Teacher Tip: Make sure that rubrics are always accessible to students before they receive actual grading from you. Including all rubrics in the original course syllabus, other than those that may be student-created, is a sure fire way to make sure of this. Consider using the Moodle Workshop activity as a long-term project of some type in your course. This activity has built in areas for self-, peer-, and teacher-assessment, as well as the ability to upload examples for practice assessment.

#3 – Rubrics take away the guessing game.

One of the most common questions asked by students is, “How can I get an ‘A’ in this course?” Rubrics eliminate the guessing game for how to earn an ‘A’ because they outline the grading objectives and guidelines, and how to achieve mastery per criteria. When evaluating students’ work with a rubric, there is little to no room for bias. Rubrics assure students that there is equality in grading and standardized expectations.

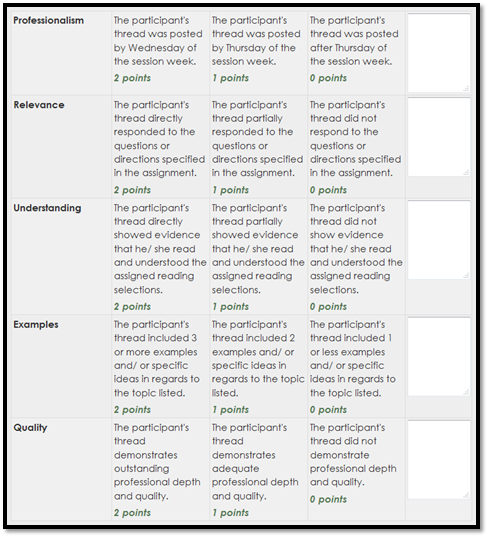
Teacher Tip: When writing rubrics for your course, consider first writing a general rubric that includes always assessed items, no matter what the actual goal of the assignment. These may be criteria such as punctuality, professionalism, grammar, and clarity. In this way, students can focus more on task-specific criteria after “mastering” general criteria. Make sure to include well-written general criteria, to make mastery possible. Use Moodle’s Rubrics to create consistent criteria and guidelines, such as in the example above.

#4 – Rubrics praise students’ strengths and support their weaknesses.

As a student, it’s hard to improve upon a specific skill unless you know you are under-performing in that area. Rubrics provide visual representations to students, depicting the exact level they are currently achieving (per criteria). This makes strengths and weaknesses easy to see, allowing students to know what areas they need develop further at a glance. Through rubrics, students are able to monitor their progress on specific criteria over a given period of instruction or time.

Teacher Tip: Rubrics show students the exact performance level they currently fall in, but you as a teacher should make sure to include adequate feedback to help students understand how to increase performance in lower scoring areas. Moodle’s Rubric feature allows for personalized feedback per criteria and overall for each rubric. Use these areas to add information tailored to the student’s specific weakness.

Image by Flickr user ProfessorTang / Creative Commons licensed BY-NC-SA 2.0

Also posted in Moodle Musings, Rubrics, Teaching and Learning | Comments Off on A case for rubrics: Four student benefits and teacher tips for use

Simple file management in Moodle 2

EasyThe drag and drop upload block allows an instructor to literally drag and drop files directly from a computer desktop into specific course locations. Once a file is deposited into the course, it appears as a resource.  Links can also be dragged into the course with the same ease.  This new feature in the upgrade will save you a significant amount of time.  Below are a few tips to consider and a quick how-to.

Tips

  • File size. There is a 20mb limit per file.  Video podcasts and audio lectures may need to be placed as links in the course site.  Large PowerPoint presentations may need to be saved as a “presentation” and then placed into the course.
  • Naming conventions. Rename files before dropping them into Moodle.  You also have the option to re-name files once in Moodle.
  • Firefox and Google Chrome. The block only works with Firefox 5 and later or Google Chrome.

Activate drag and drop

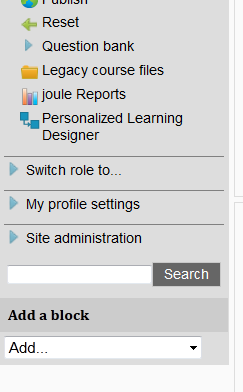
To use drag and drop, you must first add the drag and drop block to your course. To add a block, go to your course page in Moodle. Turn editing on and look at the left-side column. Scroll down till you see “Add a block” and click on “Add.”

Moodle add a block

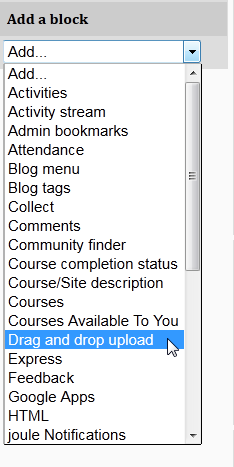
Select “Drag and drop upload.”

Moodle Drag and drop

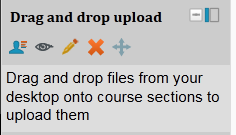
You will then see a new block added to your left-side column. If your browser supports drag and drop, you will see this notification and you can start dragging files onto your course.

Moodle drag and drop on

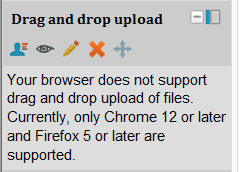
If your browser does not support drag and drop, you will see this note. If you see this message, try using Firefox or Chrome.

Moodle drag and drop not supportedImage by Flickr user Bob Rosenbaum / Creative Commons licensed BY 2.0

Dan Reis also contributed to this post.


About the author

Cheri Crabb, PhD, Academic Technology Consultant with TLT, has a career in academia focused on instructional design and development using integrated electronic media systems for blended learning.

Also posted in Moodle Musings, Organization, Teaching and Learning | Comments Off on Simple file management in Moodle 2

Manage your Moodle notifications

No Junk MailOne of the new features in Moodle 2 is the ability to customize your notification preferences across Moodle. You can set this to send you an email when something changes in your Moodle courses, such as updating an activity or changing a grade. The good news is you have total control of  your settings. You can choose to receive email, choose one of the other communication methods or even receive no notifications at all (not recommended).

Notification settings

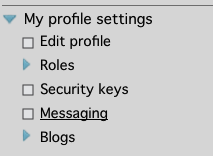
To configure notification methods for incoming messages go to: Moodle Homepage –> Settings –> My profile settings –> Messaging

My Profile Settings

View step-by-step instructions for customizing your notification options.

Notification options

There are four options for receiving notifications in Moodle. You can choose to receive all four types of notifications or none at all. You can also select a different method if you are logged into Moodle. This would be useful when you are initially building a course. Leave all the boxes unchecked to receive no notifications for a category. The messaging preferences on your profile will adjust your personal messaging preferences in all your courses.

Here are examples of each of the four types of notifications.

1. Activity stream

The Activity stream is on the lower-left side of the screen. (You may need to add the Activity stream block to your Moodle home page. Turn editing on, look at the bottom of the left column to add a block.)

Activity Stream

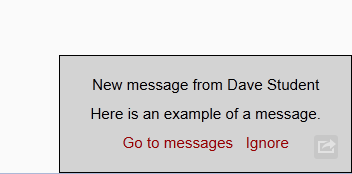
2. Popup notification

This notification appears on the bottom of your screen.

Message Popup

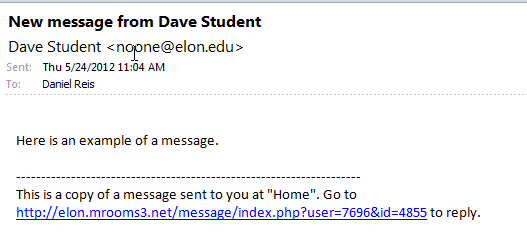
3. Email

An email will be sent to your Elon email address. You have the option to have the email sent to an alternative address.

Email

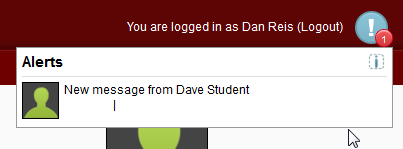
4. Alert badge notification

This notification appears at the top of the screen, next to your name. Please note: changing your course design could hide the alert badge notification.

Alert Badge

View notifications

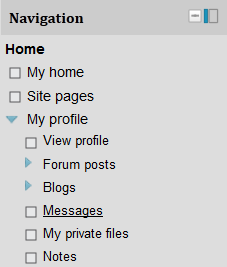
To access past notifications in your Messaging center, go to:  Moodle Homepage –> Home –> My Profile –> Messages

Message center

Image by Flickr user loop_oh / Creative Commons licensed BY-ND 2.0


About the author

Dan Reis is an Instructional Technologist with Elon University’s Teaching and Learning Technologies.

Also posted in email, Moodle Musings, Teaching and Learning | Comments Off on Manage your Moodle notifications

Moodle Calendar: Helpful tool for online courses

CalendarThe Moodle calendar is one of my favorite features, and especially helpful for Elon students partaking in the summer online program.

If you use the standard Moodle assignments and add a due date to the course activity, Moodle automatically propagates that information to the course calendar block as an event!

The calendar automatically keeps track of and displays all course related due dates (projects, quizzes, chat room appointments, assignments).  In addition, students can add personal events to the calendar and customize it with user options (i.e. the time display, upcoming events, and first day of the week).

A calendar may be included in a course by adding the Calendar blockAdditional events can be created by following these steps.

Image by Flickr user Caro’s Lines / Creative Commons licensed BY-NC-SA 2.0


About the author

Cheri Crabb, PhD, Academic Technology Consultant with TLT, has a career in academia focused on instructional design and development using integrated electronic media systems for blended learning.

Also posted in calendar, Moodle Musings, online, Teaching and Learning | Comments Off on Moodle Calendar: Helpful tool for online courses

Categories