Elon University Home

Category Archives: Moodle Musings

Simple file management in Moodle 2

EasyThe drag and drop upload block allows an instructor to literally drag and drop files directly from a computer desktop into specific course locations. Once a file is deposited into the course, it appears as a resource.  Links can also be dragged into the course with the same ease.  This new feature in the upgrade will save you a significant amount of time.  Below are a few tips to consider and a quick how-to.

Tips

  • File size. There is a 20mb limit per file.  Video podcasts and audio lectures may need to be placed as links in the course site.  Large PowerPoint presentations may need to be saved as a “presentation” and then placed into the course.
  • Naming conventions. Rename files before dropping them into Moodle.  You also have the option to re-name files once in Moodle.
  • Firefox and Google Chrome. The block only works with Firefox 5 and later or Google Chrome.

Activate drag and drop

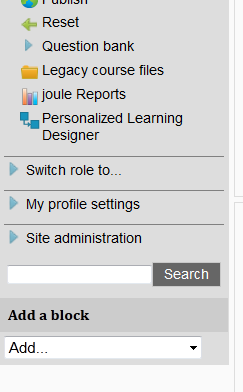
To use drag and drop, you must first add the drag and drop block to your course. To add a block, go to your course page in Moodle. Turn editing on and look at the left-side column. Scroll down till you see “Add a block” and click on “Add.”

Moodle add a block

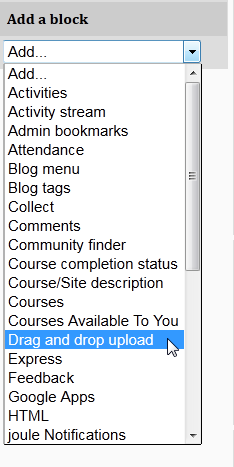
Select “Drag and drop upload.”

Moodle Drag and drop

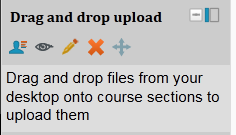
You will then see a new block added to your left-side column. If your browser supports drag and drop, you will see this notification and you can start dragging files onto your course.

Moodle drag and drop on

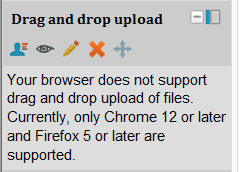
If your browser does not support drag and drop, you will see this note. If you see this message, try using Firefox or Chrome.

Moodle drag and drop not supportedImage by Flickr user Bob Rosenbaum / Creative Commons licensed BY 2.0

Dan Reis also contributed to this post.


About the author

Cheri Crabb, PhD, Academic Technology Consultant with TLT, has a career in academia focused on instructional design and development using integrated electronic media systems for blended learning.

Also posted in Moodle, Organization, Teaching and Learning | Comments Off on Simple file management in Moodle 2

Manage your Moodle notifications

No Junk MailOne of the new features in Moodle 2 is the ability to customize your notification preferences across Moodle. You can set this to send you an email when something changes in your Moodle courses, such as updating an activity or changing a grade. The good news is you have total control of  your settings. You can choose to receive email, choose one of the other communication methods or even receive no notifications at all (not recommended).

Notification settings

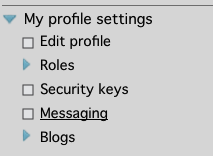
To configure notification methods for incoming messages go to: Moodle Homepage –> Settings –> My profile settings –> Messaging

My Profile Settings

View step-by-step instructions for customizing your notification options.

Notification options

There are four options for receiving notifications in Moodle. You can choose to receive all four types of notifications or none at all. You can also select a different method if you are logged into Moodle. This would be useful when you are initially building a course. Leave all the boxes unchecked to receive no notifications for a category. The messaging preferences on your profile will adjust your personal messaging preferences in all your courses.

Here are examples of each of the four types of notifications.

1. Activity stream

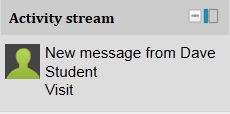
The Activity stream is on the lower-left side of the screen. (You may need to add the Activity stream block to your Moodle home page. Turn editing on, look at the bottom of the left column to add a block.)

Activity Stream

2. Popup notification

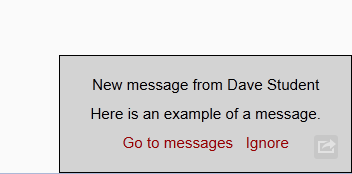
This notification appears on the bottom of your screen.

Message Popup

3. Email

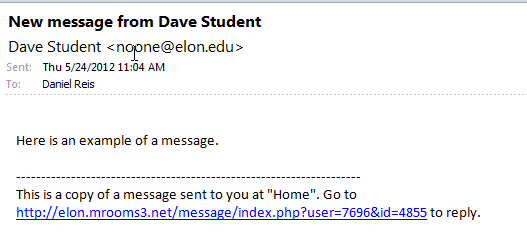
An email will be sent to your Elon email address. You have the option to have the email sent to an alternative address.

Email

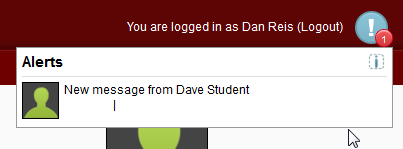
4. Alert badge notification

This notification appears at the top of the screen, next to your name. Please note: changing your course design could hide the alert badge notification.

Alert Badge

View notifications

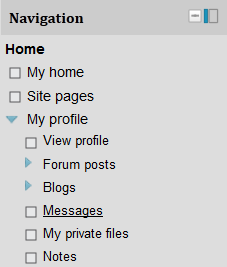
To access past notifications in your Messaging center, go to:  Moodle Homepage –> Home –> My Profile –> Messages

Message center

Image by Flickr user loop_oh / Creative Commons licensed BY-ND 2.0


About the author

Dan Reis is an Instructional Technologist with Elon University’s Teaching and Learning Technologies.

Also posted in email, Moodle, Teaching and Learning | Comments Off on Manage your Moodle notifications

Moodle Calendar: Helpful tool for online courses

CalendarThe Moodle calendar is one of my favorite features, and especially helpful for Elon students partaking in the summer online program.

If you use the standard Moodle assignments and add a due date to the course activity, Moodle automatically propagates that information to the course calendar block as an event!

The calendar automatically keeps track of and displays all course related due dates (projects, quizzes, chat room appointments, assignments).  In addition, students can add personal events to the calendar and customize it with user options (i.e. the time display, upcoming events, and first day of the week).

A calendar may be included in a course by adding the Calendar blockAdditional events can be created by following these steps.

Image by Flickr user Caro’s Lines / Creative Commons licensed BY-NC-SA 2.0


About the author

Cheri Crabb, PhD, Academic Technology Consultant with TLT, has a career in academia focused on instructional design and development using integrated electronic media systems for blended learning.

Also posted in calendar, Moodle, online, Teaching and Learning | Comments Off on Moodle Calendar: Helpful tool for online courses

New way to capture student narratives and reflection in Moodle

Image of applesThe journal in Moodle has a lot of fans. Moodle’s decision to remove it in Moodle 2 (Elon is upgrading to Moodle 2 on May 21, 2012) left a lot of people scratching their heads, TLT included. The rationale behind this decision by Moodle was that the journal was redundant because similar functionality is available from other features in Moodle, specifically the online text assignment.  For the most part, it’s true. Moodle still has a tool for student journaling and reflection; it’s the online text assignment.

Below is a run-down of what is the same and different between the journal and the online text assignment.

What’s the same between journal and online text?

  • Both feature private 1-1 communication between professor and student
  • Both are a great way to gather student assignments, reflection and feedback
  • Both give professors an option to grade entries and leave feedback on student’s writing
  • Both give professors the option to allow students to edit and refine an entry or build upon a previous entry (with Online text, check “Allow resubmitting”)

What’s better with online text?

  • Timed-release: Professors have an option to pre-populate assignments and hide them until a certain date
  • Due date: An option to specify an exact due date
  • Inline comments: Professors have the option to leave text feedback within the student’s writing
  • Rubrics: option to associate a writing assignment with a rubric

What’s better with the journal?

In the Journal activity, instructors were able to view and leave comments to all the journal entries from a class on one screen. In Online text, the instructor must click on individual students to read their entry and leave feedback. Reading all assignments from the class will likely take more clicks using online text.

What will happen to my journal activities after the upgrade?

Unfortunately, any journal assignments created in Moodle will disappear after the upgrade on May 21, 2012. Any journals you currently use in your courses will be deleted and will need to be replaced with an alternative method for collecting individual student narratives, like the online text assignment. If you need an archive of previous students’ journal entries or have a concern about losing journals, contact TLT.

Want more information?

For ideas on using journaling in your courses, check out our previous blog entries.

What do you think – is online text a good replacement for the Journal? Have you found a better way to capture student writing in Moodle? Let us know in the comments.

Image by Flickr user msr / Creative Commons licensed BY-NC-SA 2.0


About the author

Dan Reis is an Instructional Technologist with Elon University’s Teaching and Learning Technologies.

Also posted in journal, Moodle, Teaching and Learning | Comments Off on New way to capture student narratives and reflection in Moodle

Moodle upgrade brings new features: what you need to know

Image of a fortune cookie with exciting adventureMoodlerooms, our Moodle provider, has released a software upgrade from version 1.9 to 2. Elon will be upgraded to the latest version on May 21, 2012. This is particularly important for faculty currently teaching graduate courses and faculty teaching upcoming summer courses.

What you need to know about the upgrade

  • Moodle will be unavailable 8am-5pm on May 21
  • Courses already in Moodle will be automatically upgraded
  • Content should not be affected; however, you should review your course(s) after the upgrade
  • Upcoming Moodle training sessions can be found on the Technology website

New features in Moodle 2

  • Easier navigation and file access
  • Upload documents and images with drag and drop
  • Private storage for universal file use
  • Create and use rubrics
  • Improved and simplified gradebook
  • Specify time release of course materials

Important changes

Additional resources

Image by Flickr user Schlomo Rabinowitz / Creative Commons licensed BY-NC-ND 3.0

Also posted in Moodle, Teaching and Learning | Comments Off on Moodle upgrade brings new features: what you need to know

Record brief videos to introduce yourself or course content

Video Recording In Progress imageYouTube includes a largely unknown feature that makes it quick and easy to record video. That’s right — record video! It’s easy because no other video software is needed, it records directly into YouTube.

Educators can quickly record a video welcoming students to a course, introduce an assignment or important course concept, or make an announcement. These short videos are a simple way to build a connection with students, particularly for online classes. In this post, we’ll talk about what you need to record videos using YouTube, tips for recording talking-head videos and a detailed tutorial.

What you need

To record videos in YouTube, you need a webcam and a YouTube account. Mac owners are in luck because most Apple computers already have a webcam. If you don’t have a webcam, you can check one out from Elon’s Media Services, located in Belk Library. Call (336) 278-6598 for more information. If you don’t have a YouTube account (Gmail accounts also work), click here to create a Google account.

Tips for recording videos

  • Content: This method of recording videos is recommended for broad concepts or ideas rather than specific details or facts on the course content. Use these videos to introduce a concept or an assignment, tell a story that ties to the course content or as a way to humanize yourself. Detailed lecture-like recordings are better when accompanied by visual aids. If you want to include visuals such as photographs, PowerPoint slides or other images, tools like Adobe Connect, PowerPoint, Jing or Screencast-O-Matic are better at combining video and visuals. Contact Teaching and Learning Technologies for more information about these tools.
  • Script: If you don’t use a script in your classroom, don’t use one on video. Like in the classroom, your ideas should be outlined but a natural delivery is more important than a precise delivery. Try to have a conversation with your webcam.
  • Practice: It’s not easy to talk to an inanimate object. The first few times you do it, it will feel awkward. Give yourself a few times to practice. Remember, it doesn’t have to be perfect, just comfortable.
  • Be brief: Most talking-head web videos should be around five minutes. If you want to say more, record a few short videos.
  • Look into the camera: Your instinct will be to look at your computer screen while you’re recording but try to look directly into the camera. This is the best way to simulate eye contact with the viewers.
  • Backlight: Be careful not to have a window or any bright light behind you. If there is, the web camera will assume everything in the picture is that bright and will darken the entire picture and making it difficult to see you. Instead, have any bright lights in front of you, so the light is shining on your face, not your back.

Example

Here is an example I recorded in about 8 seconds on YouTube.

http://www.youtube.com/watch?v=bI3H-NlZcQE

How-to record a video using YouTube

Step 1: Connect your webcam to your computer

Step 2: Go to www.youtube.com and login with your YouTube (or Gmail) account


Step 3: Click “Upload” at the top of the page

Upload to Youtube


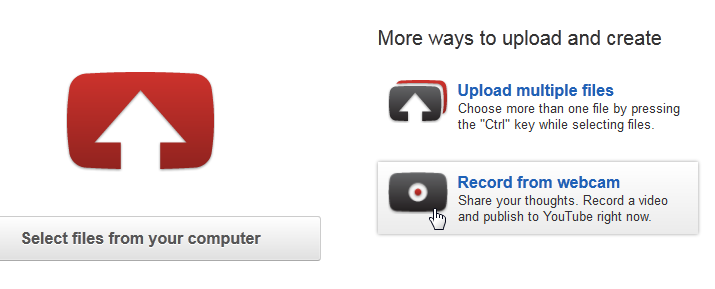
Step 4: Click “Record from webcam”

YouTube Record from Webcam


Step 5: In the popup box, click “Allow” to let YouTube use your webcam to record this video
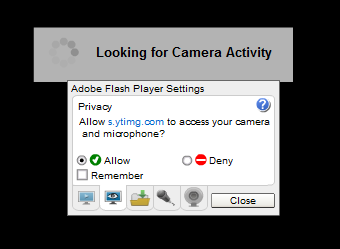
Youtube allow access


Step 6: Click “Close.” You should see yourself on the page.


Step 7: Verify your webcam and microphone settings. Test your microphone and check to see audio is being heard (say a few words, you should see audio bars moving up and down). If audio is not being registered, change the webcam or microphone settings and choose the correct microphone.

YouTube Webcam and mic


Step 8: Click the record button in the center of the screen to start recording. Remember to try to look directly into the camera, and don’t worry if you make minor mistakes. The video will feel more natural if it isn’t 100% perfect.
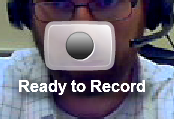
Youtube Ready to record


Step 9: When you are done, click the stop icon. The video will process for a few seconds. Additional options should appear on your screen — you have the option to “Re-record” your video (erase what you have recorded so far and record another version), “Preview” (view what you just recorded) or “Publish” (post the video to YouTube). If you are happy with the video, click on “Publish.” If not, click on “Re-record.”
Youtube Publish


Step 10: Your video is now processing on YouTube — this typically takes a few minutes. In the meantime, fill in the video’s “Basic Info” at the bottom of the page. Include a “Title,” Description,” and “Tags.” If you want to limit the people who have access to your video, change the “Privacy and publish settings” to “Unlisted.” This means that only people who have the direct link to your video will be able to view it, rather than anyone searching or browsing on YouTube.  Below is a screenshot of the recommended settings.
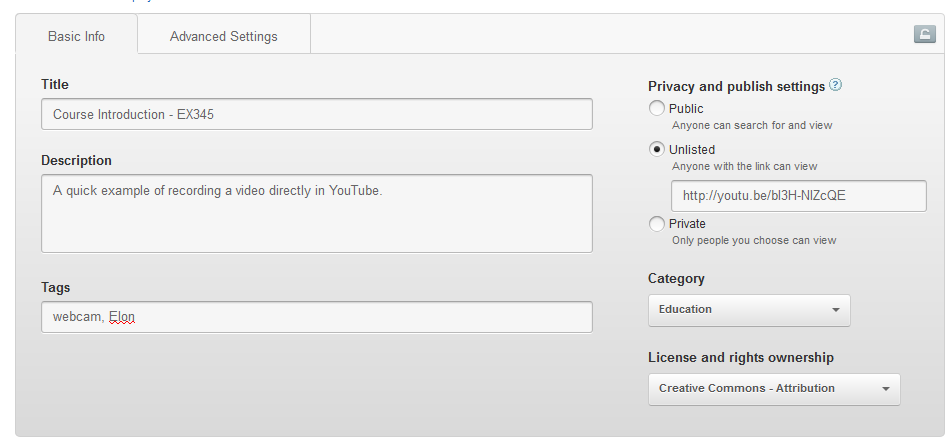
YouTube Basic info


Step 11: After you’ve added the necessary information, Click “Save changes.”

YouTube save changes


Step 12: Refresh your browser. If your video is done processing, it should appear on the screen. If it’s not ready, wait a few more minutes and refresh your browser again. Click on one of the images to set it as a thumbnail preview.
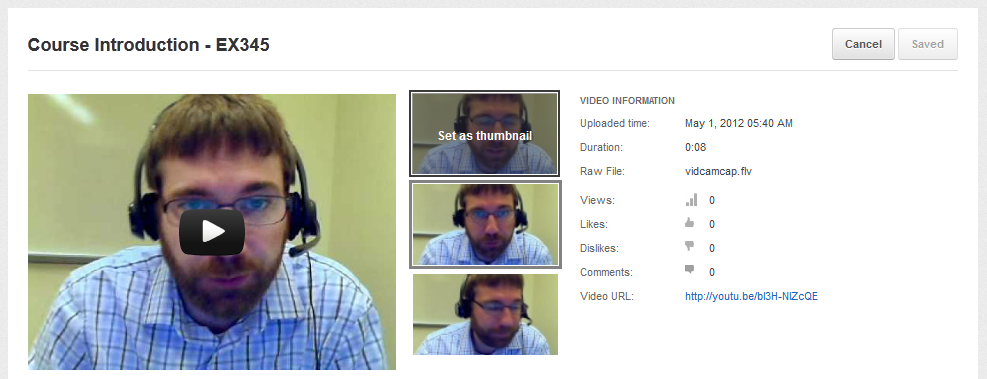
Youtube Thumbnail


Step 13: That’s it! The only thing left is to share the video with your students. Click on the “View on video page” near the top of the page. This will take you to the YouTube page for this video.
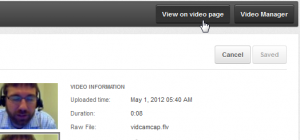
View video page

To share your video, you can either email this link to your students or embed the video directly into Moodle. To embed the video in Moodle, follow the directions from our previous post, Reduce distractions and embed YouTube videos in Moodle (skip down to the “How-to” section of the post).

Do you have another way to record videos? Let us know in the comments. Or contact Teaching and Learning Technologies with your questions or for assistance with recording your videos.

Video Recording in Progress image by Flickr user Jeremy Brooks / Creative Commons licensed BY-NC 2.0


About the author

Dan Reis is an Instructional Technologist with Elon University’s Teaching and Learning Technologies.

Also posted in Tech Tips, video, YouTube | Comments Off on Record brief videos to introduce yourself or course content

Real-time conversations with Moodle Chat

Collage of IM slangForums are the heart of communication in an online course because they provide the primary synchronous and asynchronous method for interaction. Instructors can create as many forums as needed for instruction.

Chat is a secondary mode of communication, typically synchronous, which provides instant feedback.  Unlike asynchronous forums that encourage learners to take time to compose thoughts before responding, chat rooms are informal places where learners follow the conversation on screen as it unfolds, much like observing a face-to-face conversation.  Text contributions are typically concise, written in an informal tone, often lacking appropriate grammar and filled with abbreviations such as:

  • RE: in response to what someone has contributed
  • FYI: for your information
  • F2F: face-to-face
  • THX: thanks
  • Qs: questions
  • Asmt: assessment

Chat is ideal for:

  • orientation to the course
  • introducing a unit
  • virtual office hours
  • virtual guest speakers
  • peer review of papers/projects
  • study groups for tests
  • online interviews
  • practicing a foreign language
  • online seminars
  • group discussion related to content/project/presentation/case studies
  • tutoring
  • generate ideas for writing
  • refine writing/project ideas
  • sharing a verbal process for problem solving

Adding chat to your course:

  • To add a chat to your course, click on “Turn editing on”, go to “Add an activity” then “Chat.”
  • The chats will be saved so you can access them later. You can choose how long you want to save the chats, from 2 days to forever.
  • Schedule specific chat times or have a chat room available for use anytime.
  • Schedule a chat time to automatically add an event onto your student’s Moodle calendar.

Moodle has identified issues with chat:

  • learners can send messages at any time bombarding readers with content
  • messages often arrive out of sequence
  • messages arrive quickly making it difficult for learners to follow the conversation

Image IM by Flickr user L.e.e / Creative Commons licensed BY-NC-ND 2.0


About the author


Cheri Crabb, PhD, Academic Technology Consultant with TLT, has a career in academia focused on instructional design and development using integrated electronic media systems for blended learning.
Dan Reis is an Instructional Technologist with Elon University’s Teaching and Learning Technologies.
Also posted in Chat, Moodle, synchronous, Teaching and Learning | Comments Off on Real-time conversations with Moodle Chat

Categories