Need email? Three things to get your Moodle course ready for Fall
 Fall is here! There are three important steps to get every Moodle course ready for the fall. The following steps will make it easier for you to email your students and verify all your students have access to your Moodle course. This post includes steps to:
- Add the Quickmail block to your courses so you can email students
- Enroll and remove students in your Moodle course
- Make your Moodle course available to students
1) Add the Quickmail block
Quickmail allows you to communicate with your students via email.
1A) Make sure editing is on (click on the “Turn editing on” button or link).
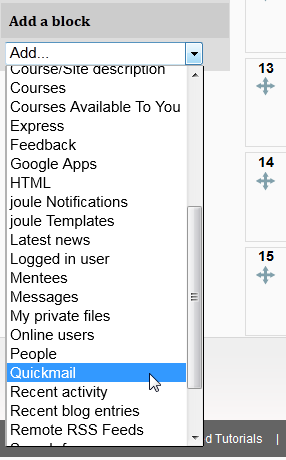
1B) Look for the “Add a block” tool at the bottom on the left side of the screen.
1C) Click on the dropdown menu and select “Quickmail.”
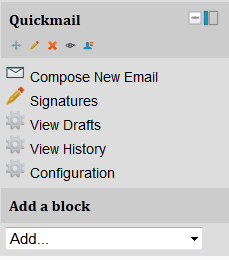
1D) Wait a few moments and the Quickmail block will appear above “Add a block.”
1E) If you want to move it, click on the blue plus sign in the Quickmail block, then click in the pink rectangle where you want to put the block.
2) Check your roster
OnTrack contains the official roster, so reconcile your Moodle roster with OnTrack.
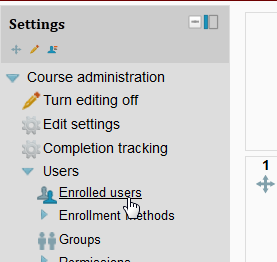
2A) On the left under Course Administration, click on Users, then click on “Enrolled users.” This will show the current roster in your course.
2B) If you need to remove someone, click on the red X on the far right beside the name of the person you want to remove.
2C) If you want to add someone, click on the “Enroll User” button at the top right.
2D) Type their username or last name in the search box, hit “Enter” on your keyboard. This will bring up a list of those who match this criteria.
2E) Click on the “Enroll” button beside their name.
2F) Repeat for any additional users you want to add to the course.
2G) Click on the “Finish Enrolling Users” button at the bottom of the Enroll Users box. The students should now appear in your course.
3) Make your course available
Students can not see your course until you make it available to them.
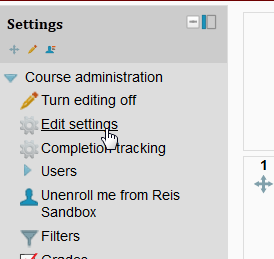
3A) On the left under Course Administration, click on “Edit Settings.”
3B) Scroll down until you see “Availability.”
3C) Select “This course is available to students” in the drop down box.
3D) Scroll to the bottom and click on “Save changes.”
For more Moodle resources, including training dates and tutorials, click on the “Home” link at the top of your Moodle page.
Image by Flickr user Christopher Chan / Creative Commons licensed BY-NC-NC 2.0


 Follow