
Katie Makepeace: Lit & PWR ‘15
For growing professionals, Facebook can present a lot of questions in terms of how to manage your online presence and identity. Although the primary audience of your Facebook profile may be family and friends, you can count on potential employers to research how you choose to present yourself through social media. Because of this secondary audience, unwanted tags and embarrassing statuses from 10th grade may suddenly seem a little less benign to you. It is helpful to brush up on the sorts of privacy tools that Facebook provides to give you more control over the appearance of your Timeline as well as which pieces of personal information are available to your intended audience(s).
The following walk-through will show you how to use the most recent Facebook privacy settings to:
- Quickly review your settings via “Privacy Checkup”.
- Control who sees future posts.
- Create friend lists to select which audience(s) to share certain posts with.
- Control who sees past posts.
- Review how others can search for your profile.
- Manage your tags.
Privacy Checkup
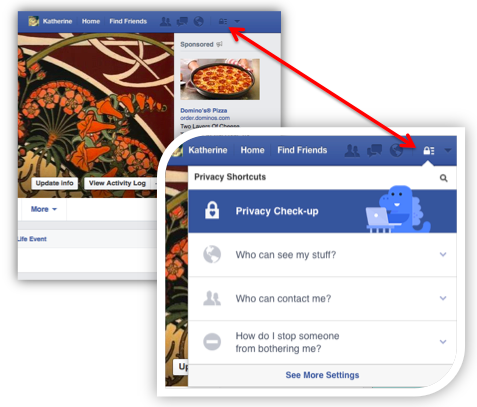 First, you will want to access the privacy settings menu. If you don’t already know, you can access this menu by clicking the “lock” in the top right corner of your screen.
The cute and industrious dinosaur in the top corner indicates the Privacy Checkup menu, where he will lead you through 3 easy steps to manage your profile settings at a quick glance.
The first window that will pop up looks like this:
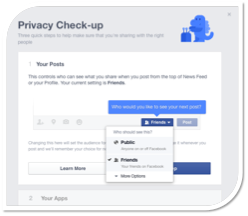
Here, you can select your audience for future posts. Facebook will save this audience preference until you tell it otherwise. You can also customize your audience by clicking “More Options” and then “Custom” in the resulting drop-down menu.
Clicking “Custom” will lead you to a window where you can tag which friends will be able to see your posts:
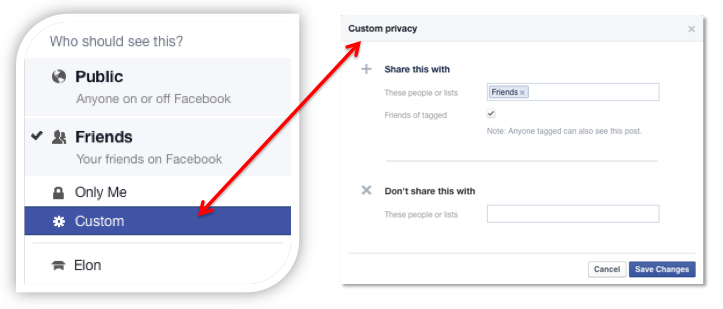
Facebook will also save your customized audience until you manually set it up otherwise.
The two windows that follow in Privacy Checkup look almost the same as the first. Step 2 will allow you to manage which apps have access to your profile. Step 3 will help you manage your contact information (i.e. which of your e-mail addresses to show, and whether you want your phone number, birthday, and home town to be visible to others). You can also access and edit your “About Me” section from the Step 3 window.
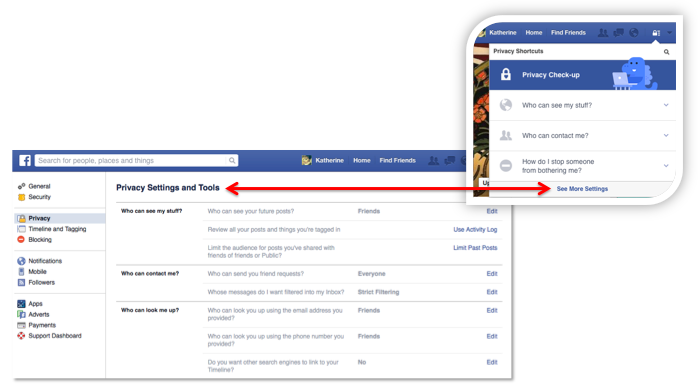
Privacy Checkup is the quickest and easiest way to review your Facebook presence, but you can also go to your Privacy Settings and Tools page for a more detailed look at your Facebook privacy settings. Access it from the Privacy drop-down menu by clicking “See More Settings”.
Limit Access to Past Posts.
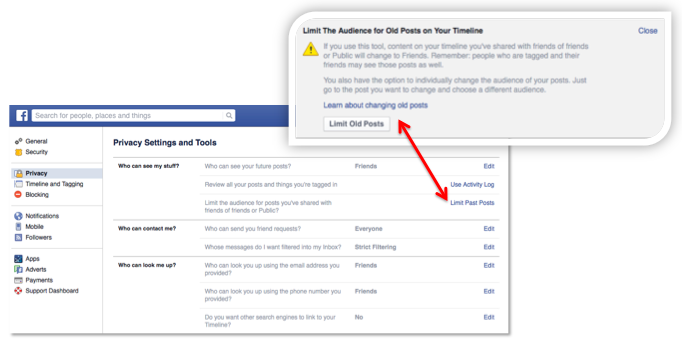
From the Privacy Settings and Tools page, the third editable option on the right side of the page allows you to limit who can view old posts by or relating to you. This will change the audience for all of your old posts to “Friends” only. If other people outside of your friends list are tagged in your old posts or photos, they will still be able to see them. You can, however, go directly to individual past posts you are tagged in and remove your tag from them. The “Limit Past Posts” option ensures that only your “Friends” can see anything you’ve ever posted on your profile, and that the angsty song lyrics you shared every day in 10th grade aren’t available to the Public:
Review How Others Can Find Your Profile.
On the Privacy Setting and Tools page, you can also manage how others can search for your profile online. There are 3 options you can change:
- You can make it possible (or not possible) to search for your profile using your phone number.
- You can also do the same thing concerning your e-mail address.
- You can make it possible (or not possible) for search engines to link to your profile.
If you look at the figure above, these three options are located under the “Who can look me up?” section. This is a helpful option in case you would like to review your online professional identity before making your profile searchable to potential employers.
Manage Your Tags.
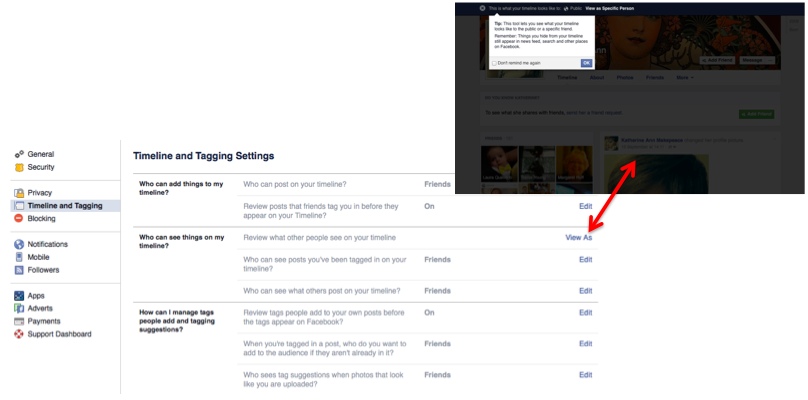
From your Privacy Settings and Tools page, you can access the Timeline and Tagging Settings using the left panel. “Timeline and Tagging” is located right under “Privacy Settings and Tools”. From this page, under the “Who can add things to my timeline?” section, you can turn on the tag review option:

This will make it so tagged posts and photos of you cannot be posted to your Timeline without your consent. Instead, tagged posts of you will show up in Timeline Review, where you can either accept a tagged post of you on your Timeline, reject it, or go to the original post and remove your tag altogether.
Review How Your Profile Looks to Others
Another cool feature on the Timeline and Tagging Settings page allows you to see what your page looks like to your “Friends”. Simply click the “View As” button as shown below, and you will see what your profile looks like to people who aren’t you. It is quite interesting, and allows you a clearer perspective of how your profile portrays your personal ethos and/or professional identity:
Conclusion
These are just a few of the Facebook Privacy Settings that may be of use to you as you begin thinking about your online presence. I would suggest going to Facebook and using Privacy Checkup to see where your privacy currently stands, and also toying around with the many new options Facebook has which give you more control over your online identity and general privacy.
 Follow