Students build handy astronomy instrument in Maker Hub

Credit: Instagram user MPD01605
Tracking the sun’s position in the sky just got a whole lot easier on the eyes, thanks to a group of Elon makers. Last fall, a group of students in Maria Falbo’s Intro to Astronomy class built a handheld device in the Maker Hub, which helps amateur astronomers make accurate solar observations without risking their retinas.
A bit of astronomy
Determining a celestial object’s position in the sky requires two measurements: One is the object’s altitude, which denotes how high in the sky the object is, measuring up from the horizon. The other is its azimuth, which is the angle between compass North and the projection of the object down onto the horizon (see diagram to the right).
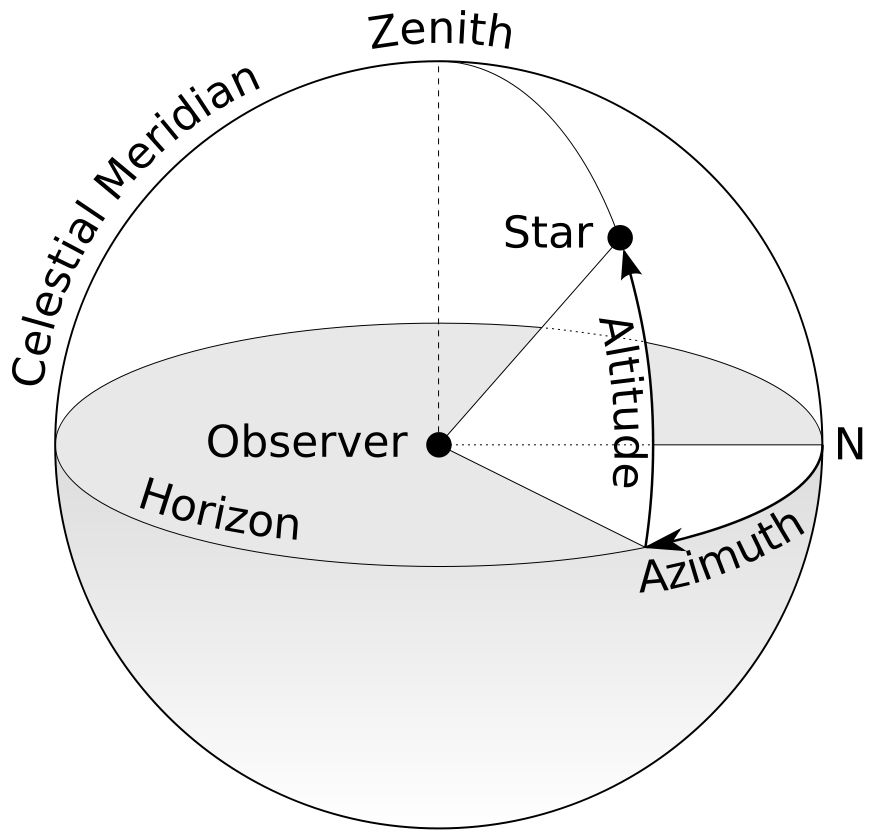
How to measure an object’s azimuth.
Credit: TWCarlson
Astronomy students interested in plotting the sun’s position can use compasses—or a compass app on their smartphones—to measure azimuth. But pointing a compass or iPhone roughly in the direction of the sun’s projection onto the horizon involves a lot of human error, limiting the accuracy of students’ solar observations. Eyeballing the sun’s position can be especially difficult on cloudy days.
Thus, Jen Finkelstein, Claire Hassard, and Ashley Hunsberger created the Light Finder to make their measurements of the sun’s azimuth more accurate—and alleviate the problem of having to squint at the sun to make said measurements.
Harnessing the power of Arduino
The primary components of the Light Finder are its photoreceptors (light sensors), Arduino board, and LED bulbs. An Arduino board reads an input—such as the light hitting a sensor—and turns this data into an output—for example, turning on an LED bulb. Arduino users can control which inputs their board reads and which outputs it produces by coding a set of instructions for the board’s microcontroller.
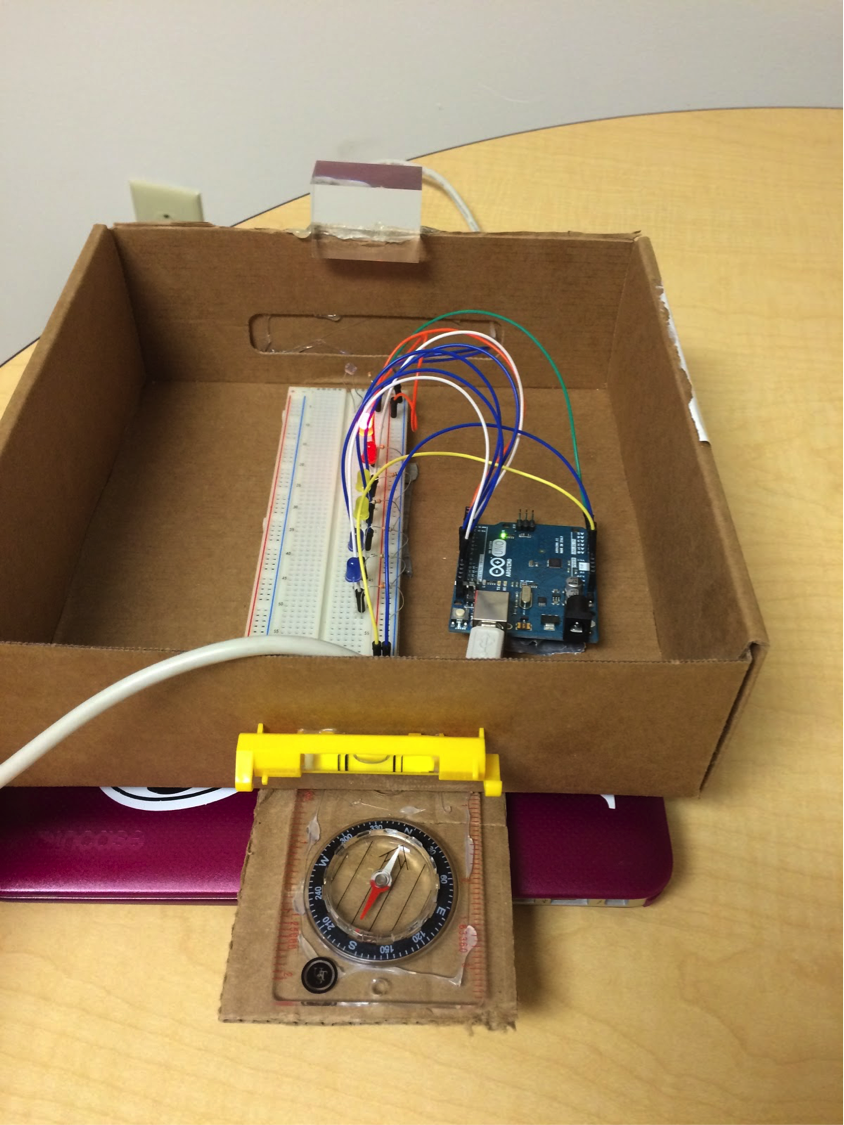
Behold: The Light Finder.
Finkelstein, Hassard, and Hunsberger set their Arduino board to read the amount of sunlight detected by the Light Finder’s photoreceptors. Then, depending on how much sunlight hit those sensors, the Arduino board turned on one or more of the Light Finder’s LED bulbs: the more sunlight the Arduino board registered, the more LEDs it flipped on.
Using the Light Finder
To measure the sun’s azimuth, users hold the Light Finder parallel to the ground (the device is equipped with a bubble leveler to help with this). Then, the user points the Light Finder approximately in the direction of the sun’s projection onto the horizon, and swivels the instrument back and forth. When the most sunlight hits the Light Finder’s photoreceptors—that is, when the Light Finder is pointing most directly at the sun—the most LED bulbs will light up. Using the compass attached to the Light Finder, the user can obtain a very precise measurement of the sun’s azimuth.
Making use of the makerspace
According to Finkelstein, the Light Finder group visited the Maker Hub several times to code and construct their apparatus. They had no prior experience using Arduino, but with assistance from Maker Hub staff and about eight hours’ worth of work, Finkelstein, Hassard, and Hunsberger successfully programed the Light Finder. Finkelstein says she now feels more comfortable with coding, and sees herself working on future projects in the Hub.
 Follow
Maria Temming
Maria Temming is a senior physics and english major. She enjoys both creative writing and science/tech journalism. Most of her writing is fueled by too much caffeine (thank you, Oak House) and classic rock music.
Follow Me:
