Category Archives: Tech Tip

Mad Men in the Digital Space: How additional courses on running ad campaigns can benefit PWR students

Angela Myers ’21 (PWR)

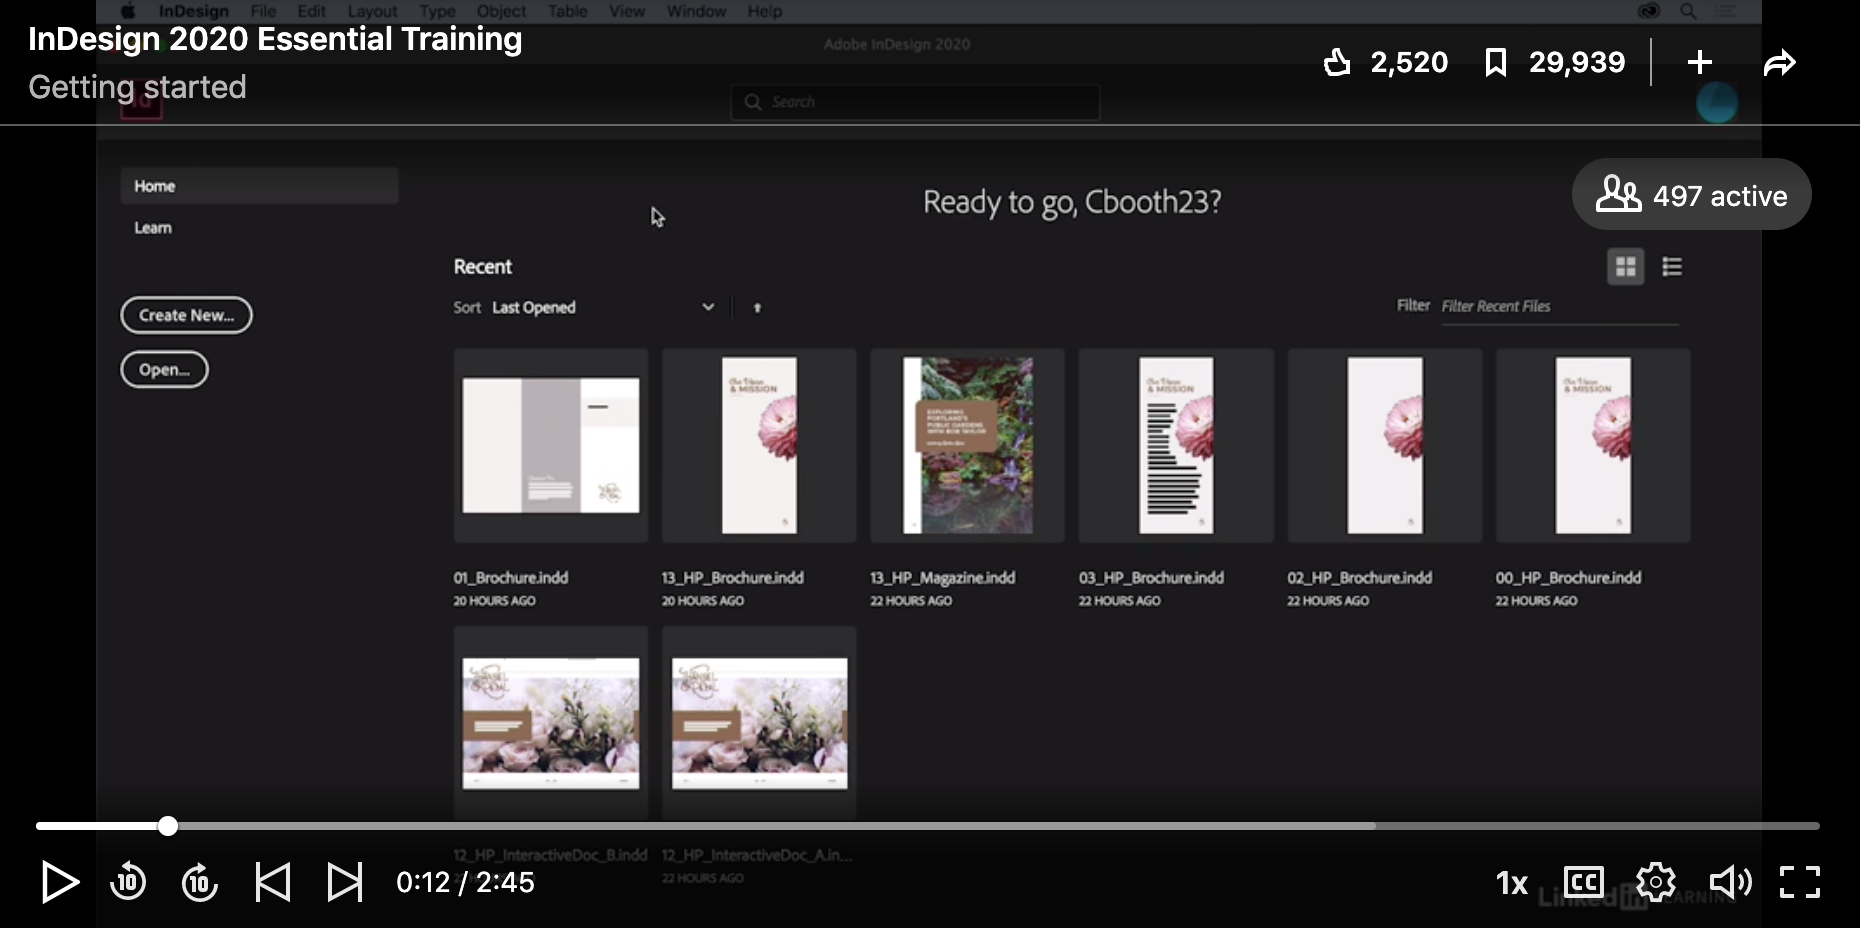
I decided to complete a Google Ads course because one of my clients asked me to run a Google Ads campaign, and it could be a useful skill to know as a future digital marketer. Whenever I have conversations with those in the digital marketing space, they always warn me away from running Google Ads; it’s a tricky thing to do well and takes a lot of practice (practice which includes investing in advertising). With this warning in mind, I went into the LinkedIn Learning Google Ads Essential Training course believing it would be about as fun as going to the dentist. The outcome of the course was to gain my Google Ads certification, a free exam from Google, and to outline a campaign for my client by the end of the semester.

The Google Ads Essential Training course is 2 hours and 28 minutes long and did a great job demystifying what Google Ads is. While there are some more complicated parts of running Google Ads campaigns, if one understands SEO, marketing funnels, Google Analytics, and basic copywriting principles, the course is easy to understand. At its heart, Google Ads campaigns rely on a persuasive, easy user experience from when someone initially clicks on the ad until they make a purchase, similar to many of the principles learned by Professional Writing and Rhetoric students.

When designing a campaign, one needs to come up with a couple SEO friendly keywords to plug into the description (usually three phrases) which will not only adhere to popular search results, but also appeal to a human when they see the ad. Depending on the type of ad, you might also be able to show a visual on the initial page or add a short description to entice them to click. Whenever they click on an ad, Google charges the advertiser so you want to ensure the landing page associated with the ad offers what the initial phrases advertised, is easy to navigate, and persuades users to convert (whether that be to join a newsletter, purchase a product, agree to hop on a sales call, or complete another revenue-earning task).

The part which differed from the basic principles of rhetoric, such as creating persuasive content with the user in mind, was understanding the analytical decisions needed for a successful ad campaign. Along with searching for keywords, advertisers have to understand how much money to invest in campaigns and how to increase the conversion rate to make the cost per click worth the investment.

This course did have two downfalls. The first is that while it is a great introductory course to Google Ads, it did not teach me enough to get my Google Ads certification. I had to also take the one hour and 12 minute LinkedIn Learning course, Advanced Google Ads, and complete an analysis on past campaigns run by my client to understand enough to pass the certification. If you are interested in running ad campaigns for yourself, clients, or as part of a future role or internship, taking these courses in tandem with some real world Google Ad examples will offer a comprehensive dive into the world of paid marketing.

The second downfall is that I would not recommend this course unless you have extensive knowledge of marketing funnels, Google Analytics, SEO, and basic copywriting principles. There are other fantastic LinkedIn Learning courses on these topics, and SEO and copywriting principles are touched upon in PWR classes, but you really have to have a good grasp on these three fields before diving into Google Ads. While a serious time investment, these Google Ads courses can be a great asset to those looking to go into paid advertising or reflecting on how the main goal of digital marketing, and most writing roles, should be to drive conversions.

A young woman with brown hair sitting in a chair, holding a MacBook


Angela Myers is a content creator, social media strategist, and writer. You can connect with her freelance work at angelamyerscreative.com or her personal brand which provides book recommendations and literary lifestyle tips to an audience of over 20,000 booklovers on Instagram, Pinterest, TikTok, and Youtube.

Also posted in Outside the Classroom | Tagged , , | Comments Off on Mad Men in the Digital Space: How additional courses on running ad campaigns can benefit PWR students

InDesign 2020 Essential Training on LinkedIn Learning

Abby Fuller ’21 (PWR & ENG:CRW)  

This year I had the opportunity to serve as Editor-in-Chief for Colonnades Literary and Art Journal, Elon University’s student run organization that publishes student work in visual art, fiction, nonfiction, and poetry. Although I served as a Co-Nonfiction Editor the previous school year, the new job of Editor-in-Chief required a lot of new skills that were less familiar to me, and one of the most important skills was InDesign.

I had some previous experience in InDesign when I took PWR 2100 (formerly PWR 217): Professional Writing and Technology Studio in Fall of 2018, but a lot of my skills were basic, and I created a final InDesign deliverable for the course that I wasn’t that proud of. Before I put together the annual issue of Colonnades, I knew I needed to advance my skills in that area and decided to take a LinkedIn Learning course in order to gain confidence in the technology. I chose LinkedIn Learning because it is free as an Elon student, and because my time as a student at Elon is quickly coming to an end, I decided to take advantage of this educational opportunity when I still could. Additionally, I’ve learned that I do better with short videos and quizzes rather than passive reading or videos that are long and drawn out. I also like the idea of completing individual skills rather than wide-sweeping topics. The course that I specifically took is titled InDesign 2020 Essential Training, and I found it very interesting and informative.

Screen shot from InDesign 2020 Essential Training course on LinkedIn Learning

Screen shot from InDesign 2020 Essential Training course on LinkedIn Learning

The essential training covered a lot of basics that were helpful for me in gaining a wide range of skills and not just a specific set of knowledge. Although the course started out with things that felt a little too basic, such as creating a new document, it laid a nice foundation of knowledge that I was able to build on later. It also allowed you to work with exercise files, helping you practice the skills you learn. The most important thing that I learned was in the final major section of the course, which focused on packaging, printing, and exporting. This is something that I didn’t know much about. Before the course I thought a simple click on the “save” button would do the trick; however when working with a document with lots of fonts, images, and links, packaging a file proved to be one of the most important things to do correctly. In the beginning, saving the 125-page journal made me anxious because I was worried that I would mess something up and lose all the work, but through this training, I gained confidence in my ability to create important and clean work while also being able to save it correctly.

The skills that I learned in InDesign 2020 Essential Training helped me work more confidently and efficiently when putting together the Colonnades journal. I was able to work on the basics without the help of my design editor, which allowed her to work more creatively on the overall design and not just input the content into the software. I also found myself being a more collaborative thinker, who took into consideration the format and limitations of the software when considering design and aesthetics. Additionally, over the 2020-2021 school year I worked as the Publishing Intern for the Center for Engaged Learning, and because of my new knowledge about InDesign, I was put on more technologically advanced projects, such as making interactive PDFs.

In my future, I hope to work in writing and publishing, fields that work with InDesign as the leading standard in publication software. I will be working with the software in my professional future, and I am so grateful that I was able to expand my skill set and work with even more confidence. Through the training program and applying my knowledge in tangible ways, I feel confident about my abilities and what I can bring to a workplace.

I would definitely recommend completing this InDesign 2020 Essential Training course if you want to grow in your InDesign skills. Additionally, LinkedIn Learning has so many helpful courses that are free for Elon students, so this is the perfect opportunity to build your skillset in a structured way.

young woman with brown hair and glasses standing in front of a body of water

Abby Fuller is a 2021 graduate of Elon University with majors in Professional Writing & Rhetoric and English: Creative Writing.

Also posted in Outside the Classroom | Comments Off on InDesign 2020 Essential Training on LinkedIn Learning

Tips and Tricks for Portfolio Design

Will Guy ’16

As you may be aware, all English majors are required to submit a portfolio at the end of their senior year. When making your portfolio, there are many aspects you will want to consider. First, be sure to look at the guidelines before you begin designing your portfolio. This blog post will aim to address the four different pieces of criteria required for portfolios, while also offering some design tips you can incorporate into your own.

If you visit the Professional Writing and Rhetoric page on Elon’s website and click on portfolios, a list of sample senior portfolios is located near the bottom of the page. If you referenced the guidelines, you’ll notice that the first of four required items for inclusion is a Letter to the Reviewer. This is a place for you to build your ethos, talk about relevant coursework, and broadly outline what you will be including in your portfolio. Be sure to include a picture of yourself. Take a look at the two images below.

Image 1

Image 2

Both screenshots meet the portfolio requirements, but which image at first glance looks more professional? You probably answered the image on the left. This writer used a tool available in most text-based programs known as “wrapping the text.” This allows a user to insert an image without having to worry about altering margins to fit an image onto the page.

The second required section is called the Introduction. This section serves as a place to introduce your work. Give a brief overview, but slightly more specific than the one you included in your Letter the Reviewer. A general tip: you may want to include an image on this page, or any others if you feel that they are relevant.

For the third component, you will include a detailed description of the assignment. Here, you will want to divide the content up into three sections: context, rhetorical strategies, and reflection. If you look at the two figures below, notice the spacing between the subject lines and the text that follows.

Image 3

Image 4


In the image on the left, the spacing between the lines is twice that of its counterpart. Close proximity implies relationship, an aspect you would want to portray in your portfolio.

The last component you need to include is your résumé. This should be on its own separate tab on your webpage. By now, you’ve probably attended many classes devoted entirely to résumé building, and likely have one that you feel comfortable with, but let’s look at a few common practices and do’s and don’t’s.

Image 5

Image 6


The résumé on the left includes good information, but it lacks significant design. Avoid trapping white space; align items either to the left or right with a corner or side to account for proper alignment. Again, there is too much spacing between line items, making the organization of the résumé appear scattered. The screenshot on the right catches your eye immediately. The large blue and black logo is the first item your eye sees. The use of color helps to create contrast, a design principle that can help you with organization. If you don’t feel that you have the skills to create an affective logo, imagine this résumé without it. Without the logo, the individual’s name is still the largest item on the document, making the document as a whole stand out.

Although your portfolio’s objective is not to land you a job, it could certainly be used to get you one. Once you publish your portfolio, it is on the Internet forever. A résumé is a good place for you to highlight your accomplishments. But if employers are interested in you and want more information and you can send them a link to your portfolio, your chance of getting hired probably just increased. I would strongly recommend updating and maintaining your portfolio well after you graduate Elon.

Comments Off on Tips and Tricks for Portfolio Design

Logo/Personal Branding Design

Jessica Trinidad ’16

In the ever-changing technological era in which portfolios and resumes have extended their presence into the digital world, personal branding has become an even larger part of the job application process than ever before. Since there are now so many different mediums in which an individual can extend their professional presence, it is necessary to consider developing a personal brand or logo that can be associated with your material. According to Google, a logo can be defined as “a symbol or other design adopted by an organization to identify its products, uniform, vehicles, etc.” (Google). These logos are an incredibly important aspect of self-marketing, for it allows the applicant’s audience to associate their material with an image/typeface, increasing recognition of the applicants materials.

Where Do I Begin?

Look for inspiration. Everywhere we look, we are surrounding by logos as a part of the marketing plan for both small and large companies. Magazines, Newspapers, and Clothing tags are all marked with trademarks and logos that represent companies intending to extend their presence and recognition. Take Starbucks for example. By placing their logo on cups, the company is extending its presence into all of the locations their consumers bring their drink to. This includes work locations, bus/train stations, airports, etc.; nearly every location can be accessed through their customers, creating a sort of grassroots marketing technique. By recognizing designers that your feel are effective in developing a successful brand, it is possible to being comprising an inspiration board or file, in which you can store designs that you feel work well, and therefore can act as positive influences when designing your logo.

What Should I Consider When Designing my Logo?

Once you have found logos that inspire you, identify the elements in those logos that are appealing and effective. Do they utilize a unique design? Is it their use of color and contrast that make the image visually appealing? These are questions you should be asking yourself regarding both other designs and the design you will be creating for your own personal brand. It is also necessary to consider what you are hoping to showcase to potential employers. What do you expect your personal logo to represent or stand for? Do you want to showcase you abilities in design? Or perhaps writing? These are questions that must be answered in developing an effective logo. When designing, it is important to think outside the box. Developing a unique logo will make your brand both more recognizable and memorable. It is important to consider alignment, contrast, and color, as well as typography, when in the design process. Consider the perception of certain colors, as well. These elements can be utilized to develop both a visually appealing and recognizable logo that can be used as identifiers for potential employers.

How Do I Actually Create My Logo?

Consider using design mediums such as Adobe Illustrator, Photoshop, or InDesign. These applications are all equipped with an incredibly large amount of features that can be incorporated and utilized to develop the perfect logo. Adobe Illustrator, contrary to Photoshop, uses vector-based images, meaning that the images created in this application can be printed to any size without losing any image quality. This is important to consider if you are looking to print your designers in a large scale, in which the design will be printed in the quality it was created in. For those individuals who are not familiar with these applications, there are other (free!) applications such as LogoYes.com or LogoMaker.com that can be useful aids in developing a personal brand.

Have you created a personal logo? Feel free to share yours or any other tips you found to be helpful in the designing process in the comment section below!

Comments Off on Logo/Personal Branding Design

Personal Branding Basics

By Ciara Corcoran ‘17

Personal branding is a useful tool to anyone in the job market, but it especially useful to us PWR majors who are trying to build our portfolios and prepare for the post-college job hunt. I wasn’t introduced to the concept of personal branding until I came to Elon so for those of you who were/are just as confused as I was, here is a brief definition: personal branding is the practice of marketing oneself as a brand by putting forth a prescribed idea about oneself and one’s work. In layman’s terms, you’re telling people what to think of you before they get a chance to think for themselves. Personal branding is a valuable method to create recognition, utilize networking, and promote yourself and your work.

Why brand? Branding is great for a number of reasons, but it can be used mainly to boost your credibility, ensure continual employment, and receive recognition for your work. Anyone can have a personal brand, but yours can stand out from the crowd by capturing your skills and personality.

whybrand

Infographic by Feldman Creative and Placester (http://feldmancreative.com/2014/07/personal-branding-power-tips-getting-online-brand-line/)


Here are nine steps to begin your personal branding process. Keep in mind that it is a process and how you brand yourself now as a college student probably won’t be the same way you brand yourself in 10 years as a professional in the workforce.

  1. Who are you?

Identify your strengths, talents, and passions. Think about your education and levels of experience in the field you want to pursue. Pick three ideas you want to convey to potential employers/clients and center your brand on those ideas.

  1. How are you perceived?

Ask friends, peers, employers, etc how they perceive you. Is this the image you want to portray? Oftentimes how we see ourselves is not how others see us, so make sure that you are sending the image of yourself that you want to send.

  1. What do you want to achieve?

Do you want a job after graduation or are you just looking for a summer internship? Think long-term and short term. Consider the field you are entering and how to best market yourself to employers in that field.

  1. Create your brand

You can achieve this through your resume, cover letter, portfolio, online presence (blog, social media), business cards, and anything else you use to promote yourself. In terms of presentation, you can use fonts, colors, images, logos, or any combination of these. Don’t let these elements overpower your work. Find a balance so that people can see your individuality, but they aren’t overwhelmed by your choice of a rainbow Comic Sans font.

  1. Create your ecosystem

Share your work with your close connections in your community. This is a starting point to getting your work out there and building a foundation for your brand.

  1. Create your network

After establishing your ecosystem, you can expand your work and reach out to potential clients and employers. Linkedin is a great resource for this. Just make sure your profile is up-to-date!

  1. Create original content

Always update your blog, resume, portfolio, and social media so employers can see the most current version of you and your work. Keep your work appropriate for your platform!

  1. Get involved and share

Engage your audience! Comment, like, share, follow, and tweet your heart out to keep your audience interested in what you are doing and expand your network.

  1. Listen and monitor

Accept the criticism you get and address it accordingly. Maybe one of your platforms isn’t receiving as much traffic as your would like. Identify your weak spots to strengthen your overall image and build the best personal brand that you can.


Creating a personal brand may seem like a daunting task, but taking the process step-by-step is a simple way to make sure you aren’t overwhelmed with work. Start early so by the time you are looking for jobs and internships, you have a solid foundation to build from. The CUPID Blog has even more resources on personal branding from portfolio design, to resumes, to branding for introverts. Make the most of your brand, but most importantly make the most of yourself because that’s who employers will be hiring, not your cover letter, not your resume, not your portfolio.

Comments Off on Personal Branding Basics

Personal Branding with Pinterest

Ciara Corcoran ‘17

When most people think of Pinterest, they think of hair tutorials, seasonal recipes, or DIY crafts. While Pinterest does have plenty of resources for each of these things, Pinterest also has resources for creating a personal brand. Additionally, Pinterest provides a platform for promoting that brand. Pinterest is just one social media outlet to promote your work, your goals, and ultimately yourself.

Let’s start with resources. Doing a quick search for personal branding in the Pinterest search bar gives you pages of infographics on resumes, cover letters, and even tips on what to wear to a job interview. How do you create a personal brand? There is an infographic for that.

personal_branding_graphic

http://jorgensundberg.net/way-personal-branding-infographic/


More specific searches can lead you to information on personal logos, resume templates, and hundreds of examples of business cards to inspire your own designs. Of course, you can also Google any of these categories, but Pinterest provides both textual and visual aspects to create a personal brand that you can’t get by clicking through link after link on Google.

How can you use Pinterest to promote the brand you’ve already created or are in the process of creating? Your Pinterest profile allows you to link your other social networks including Facebook, Twitter, and Google+. Additionally, you can include your website and location, making yourself more available to potential employers or clients.

The website itself allows you to create boards that are collections of similarly themed items. For example, you could create a board of graphic design products by pinning your work onto the board. Your boards can also highlight your interests by showcasing travel photos, writing resources, or projects you hope to accomplish. Pinterest is a more creative social network than Facebook or Twitter, so use this platform to highlight your creative side if it’s appropriate for your job industry. Pinterest coins itself as a “visual bookmarking tool,” so keep in mind that the nature of your pins should be primarily images in the form of artwork, pictures, infographics, or other visually engaging media.

Pinterest Pointers

  • Be consistent! Personal branding is most effective when employers can recognize you across different networks. Your Pinterest profile picture should be the same as your Twitter icon which should be the same as your Facebook profile picture.
  • Be professional! Yes, Pinterest does have many great hair tutorials, but save those for your personal account (Unless, of course, you are a hair stylist in which case, pin away)
  • Be engaging! Your profile can be made public so employers can find you, but jump-start the search by following companies who may hire you. Not sure if a company is on Pinterest? Here is a list to see for yourself.

Pinterest is a social media platform that can be used to your advantage. Illustrate what kind of person you are through your brand. Pinterest gives you the opportunity to show your creative side by creating categories of visuals. Paint a picture of yourself to your potential employers. Just make sure your Dream Wedding Board and your Mixed Drinks Board are on private.

Comments Off on Personal Branding with Pinterest

Best Practices for Citing Pictures with Creative Commons

Will Guy ’16Will Guy

Creative Commons, also denoted by the © symbol, is a way for authors of media to federally protect their work. For example, the average Instagram user does not have a Creative Commons license; as such, his or her photograph can be used or sold without his or her permission. Although a Creative Commons license can protect several different types of work, for this blog post, we’ll focus on some best practices for the attribution of images that are protected under a Creative Commons.

Imagine that you’re writing a research paper and you chose to include an image you found on a website of a historical document. For this scenario, we’ll be attributing an image of a king painted onto a piece of sandstone by Egyptians. When attributing any image with a Creative Commons, it’s important to include the title or caption with the image, the author, and the licensing type.  Follow the steps below to attribute this image:

Step 1: Identify the title or caption

creative-commons-1

Here, the title is “Temple Relief of King as Child Protected by Goddess”

Step 2: Identify the author

For this particular image, there is no clear author. Remember, we are concerned with attributing the image, not the text associated with it, so it’s slightly different than your in-text citation with no author.

creative-commons-2

Note here again that there is no author. The website tells us to credit the Brooklyn Museum, instead.

Step 3: Identify the licensing type

Here, it is clear that the type of license is Creative Commons. However, there are several different types of Creative Commons. Click the second link and it will bring you to a new webpage.

creative-commons-3

Once you click the link, your web browser should now have this image:

creative-commons-4

This webpage tells us that the particular image we’re using is a Creative Commons Attribution 3.0. In addition, the Creative Commons provides information on what we can and cannot do with the image.

Step 4: Format the Attribution

If you’ve followed the preceding steps, you should now have a title, an author, and a licensing type. For this image, the format is as follows:

“Temple Relief of King as Child Protected by Goddess” by the Brooklyn Museum user ________ (name of user) used under Creative Commons Attribution 3.0 license. Note that the “Creative Commons Attribution 3.0” is a hyperlink.


Information for this blog post was gathered from the following websites:

http://creativecommons.org/about

http://www.newmediarights.org/guide/how_to/creative_commons/best_practices_creative_commons_attributions

http://librarianbyday.net/2009/09/28/how-to-attribute-a-creative-commons-photo-from-flickr

http://www.brooklynmuseum.org/opencollection/objects/3788/Temple_Relief_of_King_as_Child_Protected_by_Goddess

http://creativecommons.org/licenses/by/3.0/ 

Comments Off on Best Practices for Citing Pictures with Creative Commons

Website Building with Wix

Rachel Weeks ‘16Rachel Weeks profile picture

Wix.com is a free, intuitive website builder with numerous options for creating and customizing a website for both personal and professional uses. A diverse website builder, Wix.com is host to websites representing people and businesses from photographers, to bloggers, to professional chefs. Particularly relevant to PWR students is Wix’s notable versatility in terms of representing your professional and personal identity. With a wide variety of themes and customization options to choose from, Wix is the perfect choice for any PWR student looking to showcase their professional abilities.

Create a Wix account

Wix Screenshot 1


  1. Go to Wix.com and click “Sign In” on the Wix homepage. Enter your email and a password, and make sure the “I’m a new user” bubble is selected. Click “Go.” On the next screen, enter your email and password again, and then click “sign up.” You also have options to sign in through Facebook or Google +.
  2. Select a category based on the type of website you want to create. You have numerous options: from business to personal needs, you’ll find a category that includes the kind of professional identity you want to convey.
  3. Choose a template. This is not at all a constraining choice due to the variety of customization options you’ll find after you begin editing your website. With that said, choose a theme you feel has the best organization for the content you want to display and play around with it later. Click the “View” button to preview a theme before you click “Edit” to begin customizing your website.

Wix Screenshot 2

Customize your Wix

1) Use the customization toolbar on the left hand side of your screen. Here, you’ll find the “Pages,” “Design,” “Add,” “App Market,” and “Settings” tabs that contain all the tools you need to customize your website.

Screenshot 3

2) Change your color scheme, website header, and begin adding your content. You can choose from more than forty color schemes, multiple fonts and font styles, and add media content such as music and videos. Images, image galleries, and embedded social media links are options as well.

Wix Screenshot 4

3) Link your website with your Facebook, as well as share your website across other social media platforms like Twitter. Add interactive features like a live chat feature in the “App Market” tab, or a slide show photo gallery.

4) Click “Save,” then pick a name for your website.


Wix Screenshot 5

Finish Up

1) Click “Preview” to see what your website looks like before it’s published. Take note of anything that doesn’t work that you’d like to change, and then click “Save” again to set your changes.

2) Publish your website and visit the finished product at your web address.

3) Continue improving your website from your dashboard. Here, you can continually edit and update your website, as well as explore other features on Wix.

Wix Screenshot 6

4) By clicking the “Edit Site” button, you’ll be taken back into edit mode where you can continue customizing your site. In the upper left hand corner, you’ll see a small button shaped like a mobile device, the “Mobile Editor” option. By clicking there and then “Add Mobile Elements,” you can design how your website appears on mobile devices such as cell phones.

Wix Screenshot 7

Wix.com is a versatile, dynamic website builder that is perfectly suited to the needs of PWR students because of its many customizable features. These features give you the ability to adapt your website to almost any situation, as well as consistently update as your content and purposes change. Additionally, they allow you to showcase your personality and build your professional identity. Whether you’re interested in a website for personal or professional reasons, you’ll likely find what you’re looking for by using Wix.

1 Comment

How to Make a Weebly

Abbey Foucart, English PWR Major ’17

With all the website makers to choose from, Weebly stands out as a great choice for any purpose or audience. Among its options are both professional and recreational appearances, and straightforward instructions make it fairly easy to use.

To sign up for a website, go to the homepage, www.Weebly.com, and enter a username, email, and password. You are next directed to choose whether you want to pay for additional services. If you are aiming to create a more professional presence, you may be interested in these, but no money is necessary to create a basic page. Additionally, you must choose the focus of your site: site, blog, or store (although this choice does not impact the features you can choose from later).

There are several choices for a website theme; if the abundance of options seems overwhelming, you can use the top search for a style or color that fits the type of site you are creating:

Weebly blog 1

Once you have chosen the basic options, Weebly provides you with a tutorial of how to use the website, referred to as the “Site Planner”. You are prompted to document the goals for your website, although this is not a mandatory step. Use the menu on the left side of the screen to move between different steps, marking at the bottom left-hand side of each that you have completed the step.

Weebly plog 2

Now it’s time to make the site your own! Use the tabs located at the top in blue to toggle between different editing options. The first two tabs, “build” and “design, give you a visual of the website that you can interact with and edit. In build mode, you can choose to incorporate different types of media by dragging the corresponding box on the left menu to the white block on the webpage that says “drag elements here” and then clicking on the white block to upload or drag the media. An example is shown below.

Weebly blog 3

Within build mode, you can edit header sizes and pictures.

“Design” mode allows you to edit the overall appearance of the site rather than the content. It alWeebly blog 4
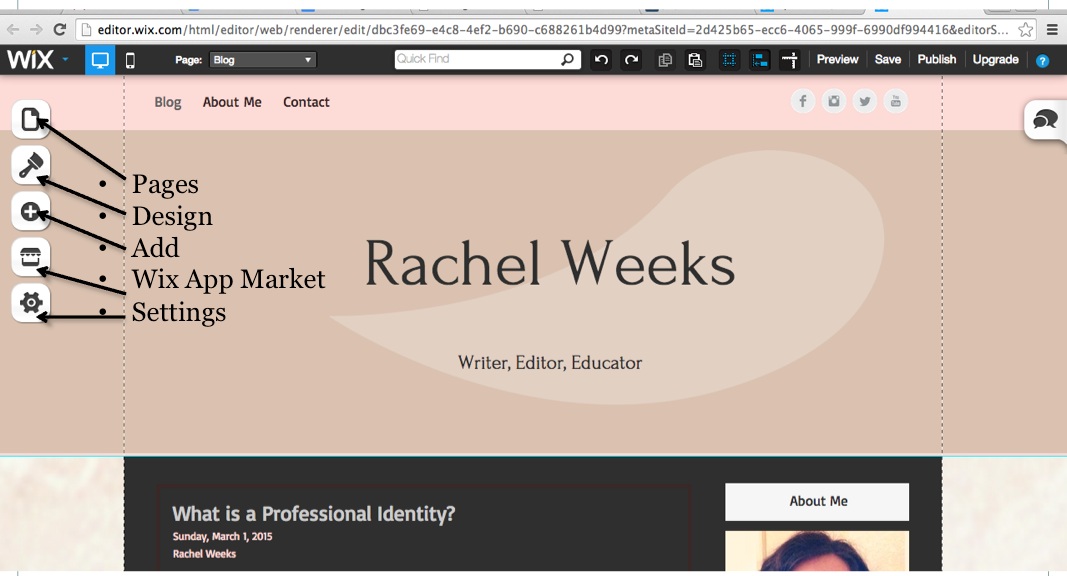
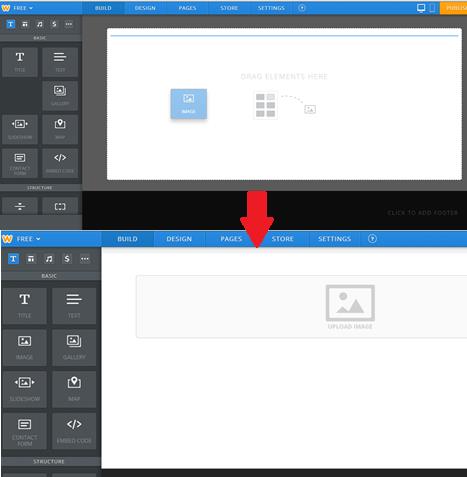
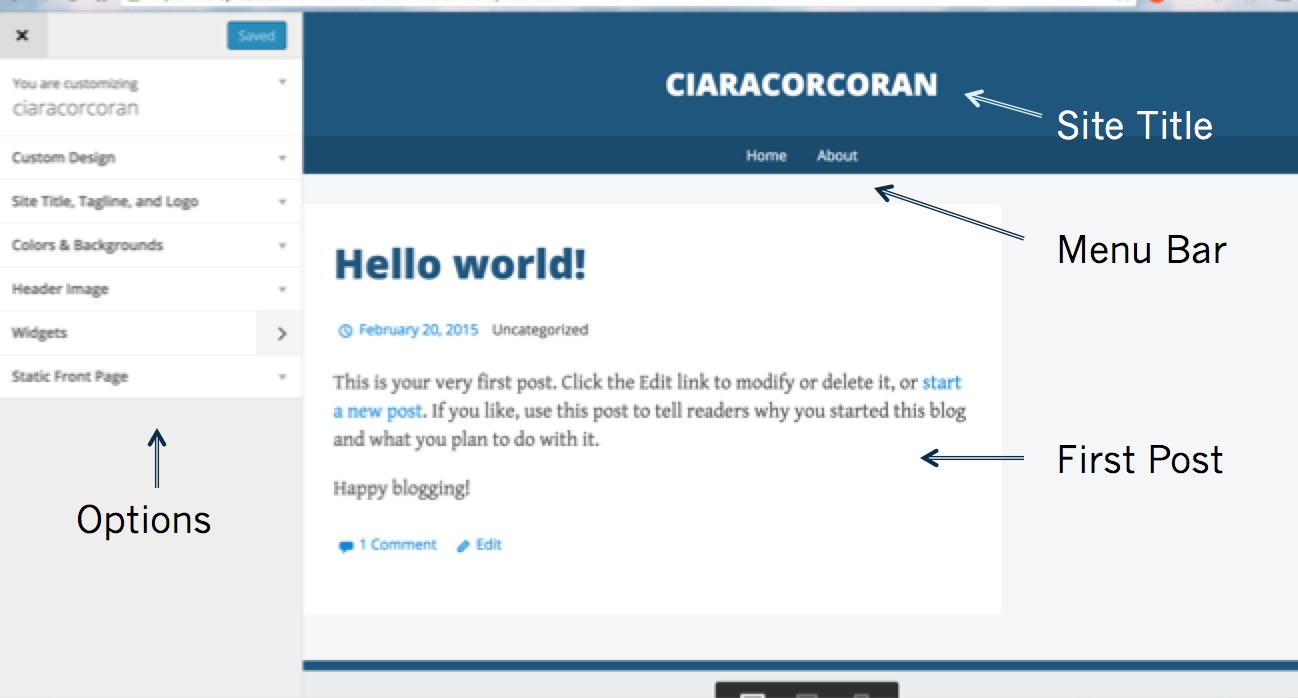
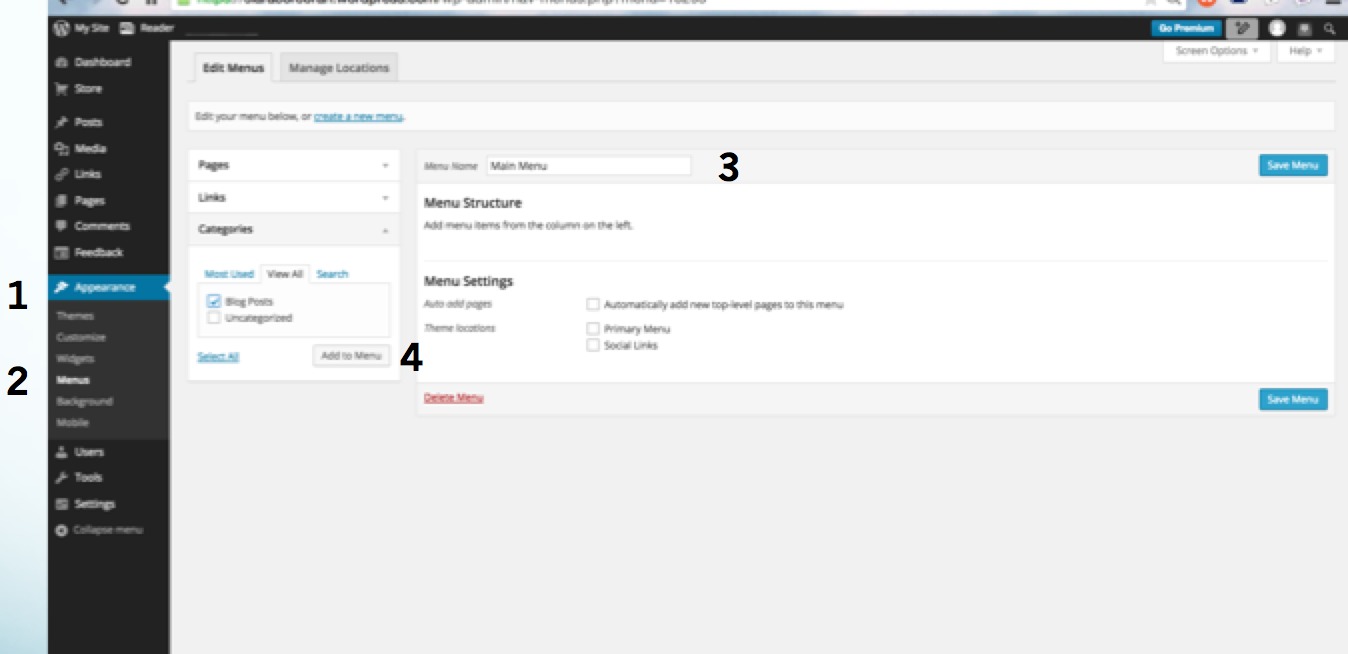
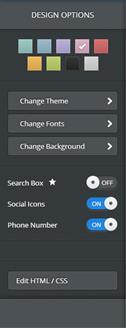
so lets you edit headers but more broadly lets you change font, background, and theme. This is an opportunity to give your website its own unique presence; even if you choose not to pay for a special package, there are enough design options to prevent your site from looking like another.

Next after “design” is the “pages” tab. Weebly starts you off with three pages: “Home”, “About”, and “Contact”. Under this tab you have the option to change the types of pages, choosing from “standard”, “blog”, “store”, or an “external link”. You can also change the page names, change the privacy of specific pages, add pages, and reorder them. There is an interactive list of pages on the left side column (highlighted by a red box in the image below): click on a page to edit it or drag it up or down to change the order. To create a subpage, drag a page under another and to the right. When someone navigates your website menu, they’ll see the subpage when they place their cursor on the  pageWeebly blog 5 
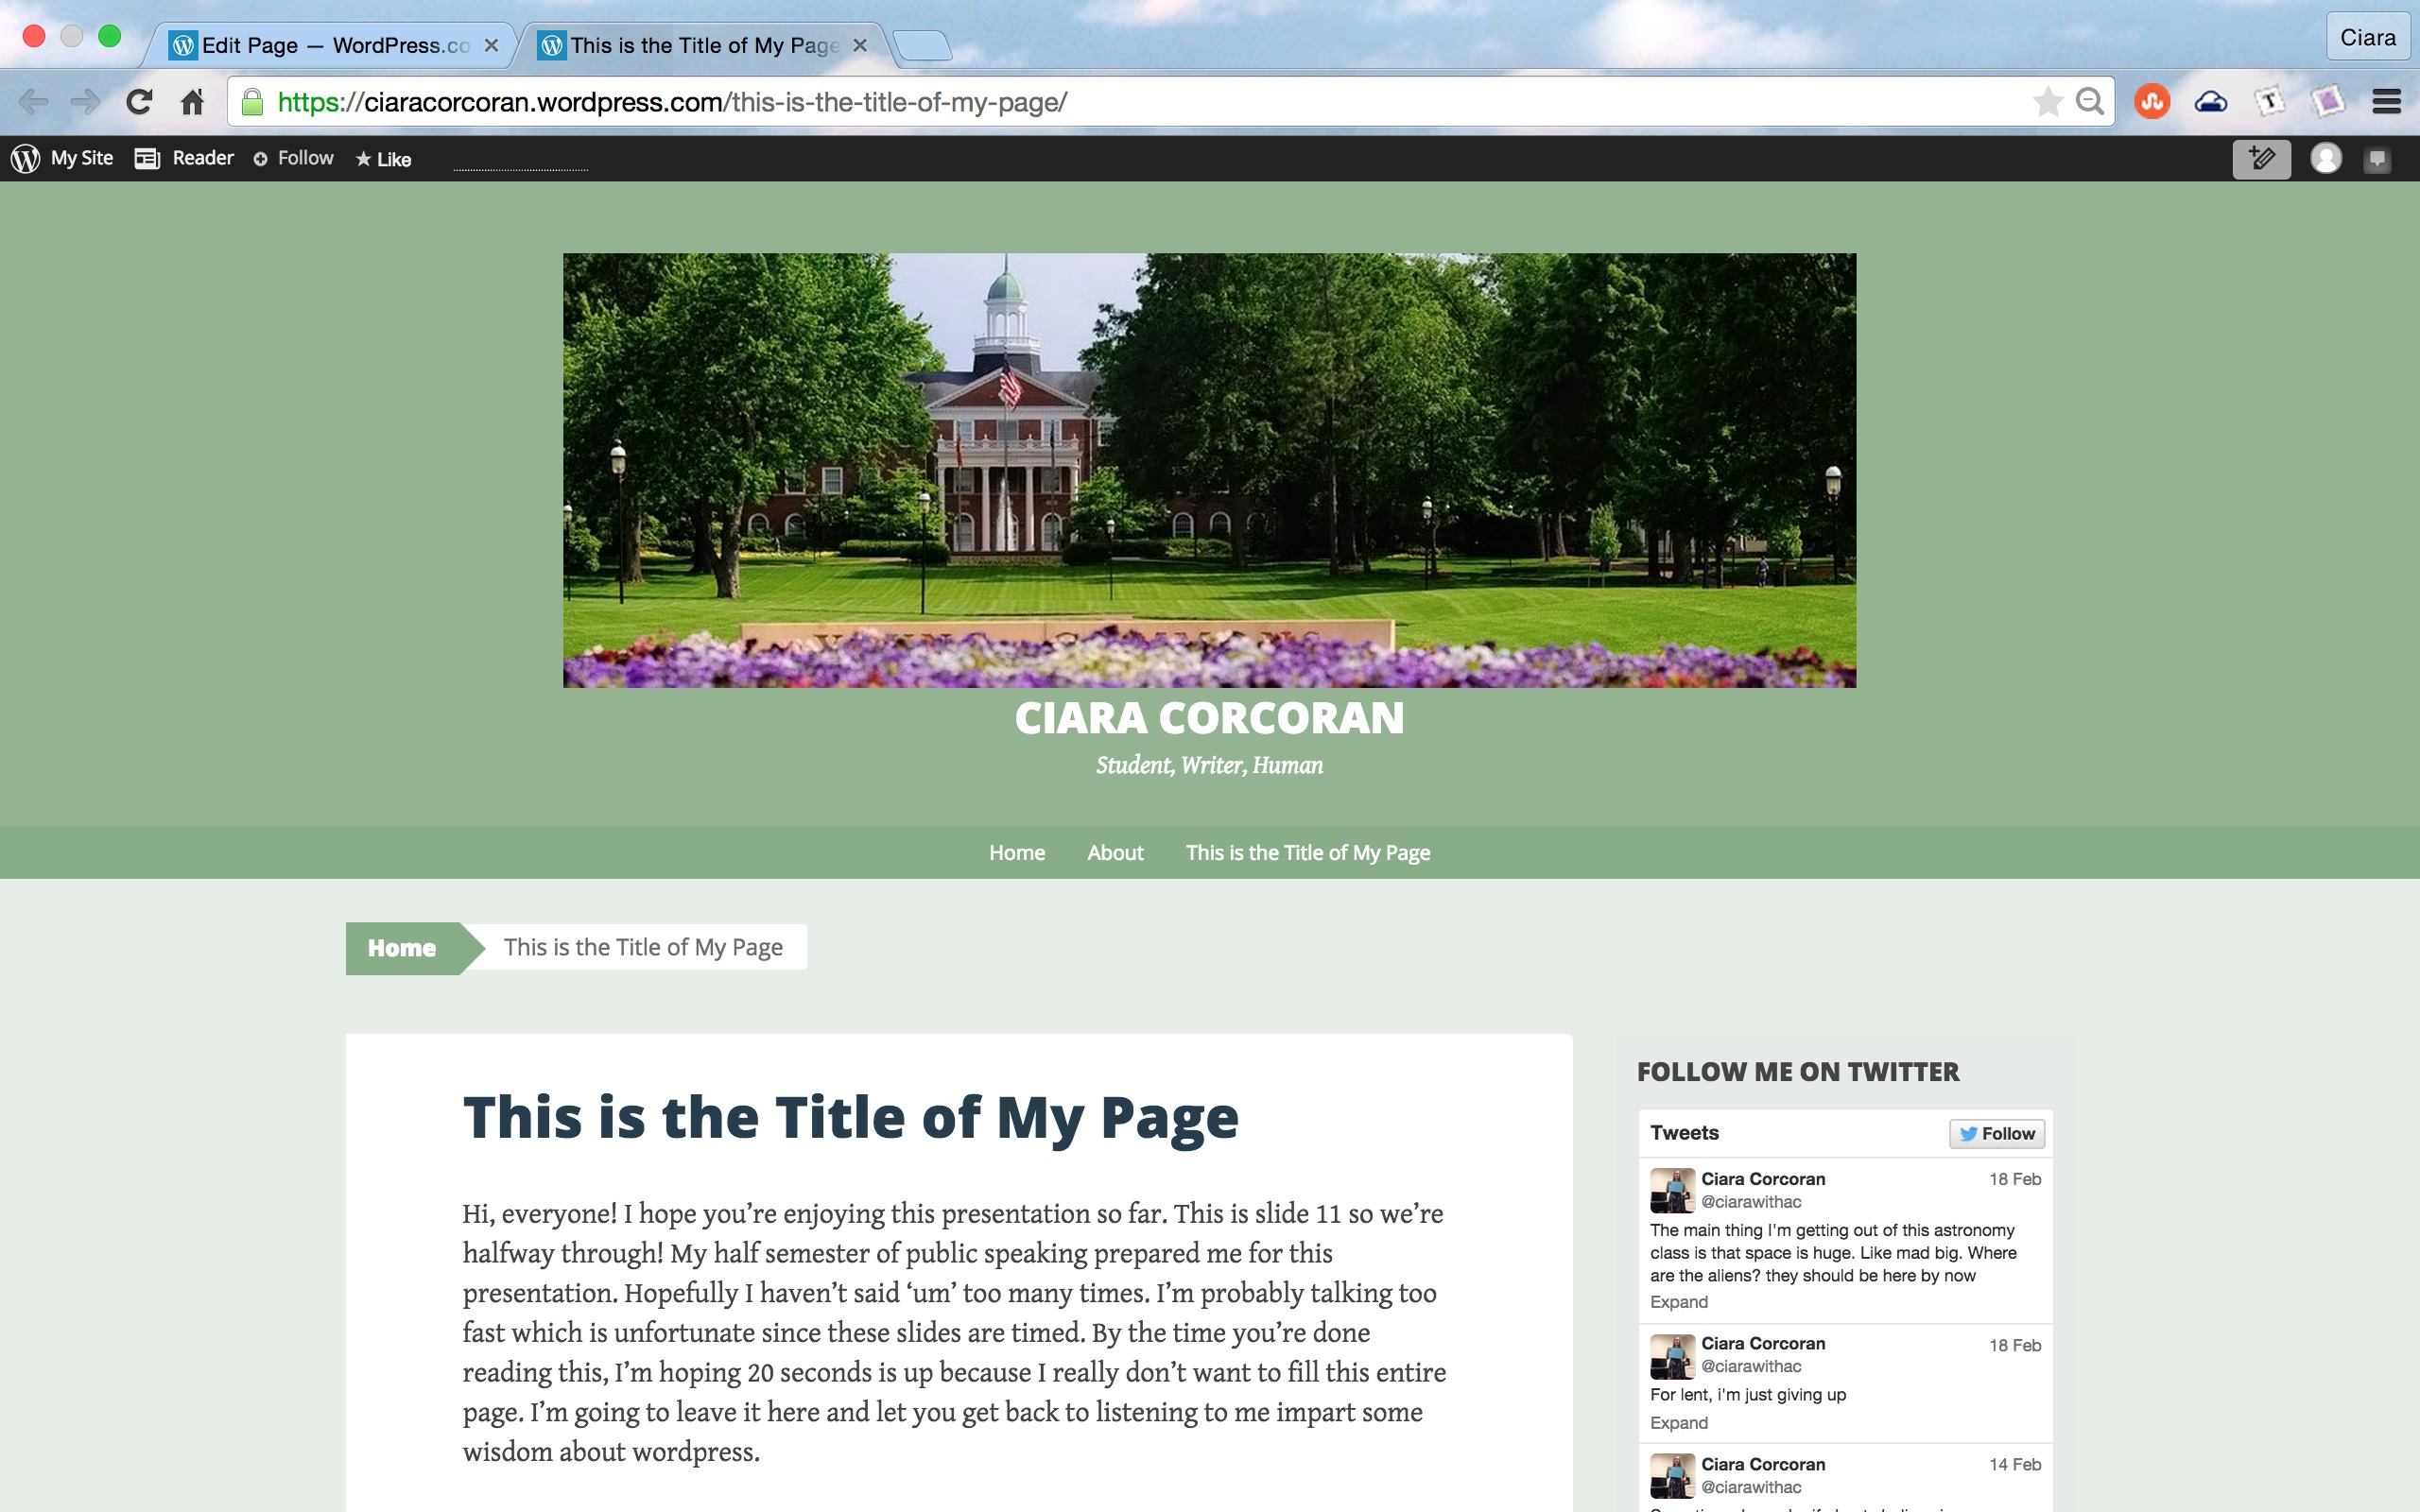
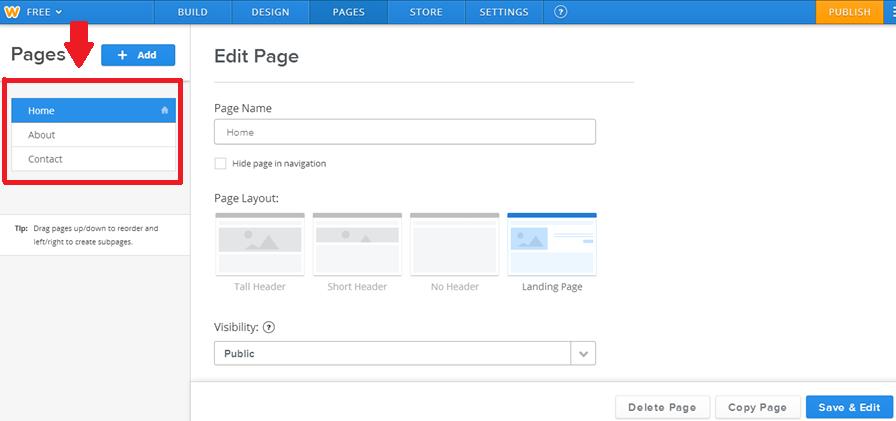
title it is connected to.
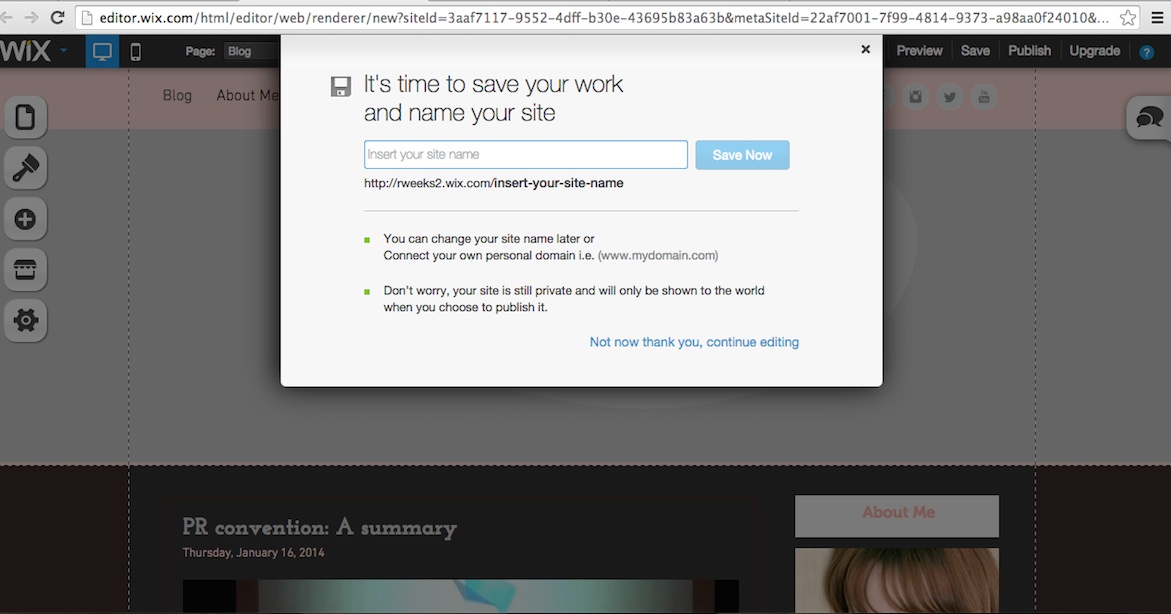
 

Weebly has the unique option of letting users design an online store. If this is the intended purpose of your website, click on the “store” tab, which allows you to add all the elements required for an online store: upload products, choose pricing, and create coupons.

In the last tab, “settings”, you decide on the domain and name of the website. By going through the menu on the left, you can add editors and members to your site if desired. If you want people to be able to access your website through search engine, you can edit your options by clicking SEO in the menu.

When your site is ready for the public, don’t forget to hit “publish”! Click the publishing button located in the top right-hand corner. You will be asked again whether you wish to change your domain and then asked to verify your identity. You can opt to share your website on different forms of social media to gain more viewers.


1 Comment

Working with WordPress

Ciara Corcoran ’17ciaracorcoran

WordPress is a media content platform, often used for blogging. PWR students can use this platform to create their portfolios and enhance their brand identity. Once mastered, WordPress is an accessible platform and knowledge of the site can also be a draw for potential employers.

Create an Account

  1. Select a site address that promotes your professional identity. Using your first and last name is an easy way to do this.
  2. Choose a theme. Many of the themes are more conducive to photographic content, so make sure the theme you pick promotes your format of work.
  3. Check your email to confirm your WordPress account

Customize Your Site

  1. Edit your site title and to promote your brand. Keep in mind that this is the most prominent text on your site.

photo1

  1. Insert any headers, backgrounds, or logos using the options on the left sidebar. You can also adjust the color scheme if you choose.
  2. Add any widgets (Twitter, Instagram, etc.) to promote your identity.
  3. Decide if you would like a static front page or a front page that displays your latest posts. This choice will depend on portfolio style and personal preference.

photo2


Add Pages

  1. On your dashboard, select the “Add Pages” option.photo3
  2. Title your page and add the content that you would like to add to your portfolio. This would be a good space to explain the nature of a project and highlight its different aspects.
  3. Preview your site to gauge any necessary layout adjustments.


Create Categories

  1. Categories can be linked to their own pages or added to existing pages, making site organization much easier. Begin by selecting the “WP Admin” option on your dashboard.
  2. Select “Posts” and then “Categories” to create the labels for the different elements of your portfolio.

photo4

  1. Add the category to your menu by selecting “Appearance” and then “Menu”. Check the box for the category you have just created.

photo5

  1. Return to your dashboard and select “Menu” from your left sidebar. Add your new menu to your site so your category will be listed. You can now tag blog posts with this category and they will automatically be added to that category’s page.

photo6

These steps are just the beginning to creating a portfolio using WordPress. Different themes offer different options, so playing around with a variety of formats can be useful. Certain themes give you space for your personal branding techniques such as headers, logos, and taglines.

Another idea to consider is incorporating multimedia content into your portfolio through inserting photos, videos, or links to other published work. You don’t have to limit yourself to text-based communication. A final thought is that your portfolio is a reflection of you and your capabilities. Create a site that speaks to your personality as a professional. If you aren’t a black-and-white, Arial-font type of person, don’t use Arial in black and white. Present the best version of yourself through your WordPress so that employers will want to know the writer behind the words.


1 Comment